Python HTML to PDF with WeasyPrint and PyPDF2: Full Guide


This guide walks through Python HTML to PDF conversion using three libraries: WeasyPrint, Jinja2, and PyPDF2. Whether you need to generate reports, invoices, or certificates, this approach turns your existing HTML and CSS skills into a Python PDF generation workflow. The tutorial builds a recipe card generator that converts structured JSON data into printable documents.
Understanding the HTML to PDF Conversion Process
Python HTML to PDF conversion involves two main steps:
1. Rendering the HTML content.
2. Creating or manipulating the PDF document.
Since PyPDF2 focuses on PDF manipulation rather than HTML conversion, this tutorial combines it with WeasyPrint for rendering and Jinja2 for templating.
Python PDF Libraries: WeasyPrint, Jinja2, and PyPDF2
WeasyPrint
WeasyPrint renders HTML and CSS to PDF with high fidelity. Features:
- Modern CSS3 support (flexbox, grid layouts).
- Typography controls and custom fonts.
- Page headers/footers and media queries.
- Vector graphics rendering.
Jinja2
Jinja2 is a template engine that bridges your data and HTML structure through:
- Templates with dynamic content placeholders.
- Logic controls (loops, conditionals).
- Template inheritance.
- Automatic HTML escaping.
- Direct data formatting.
PyPDF2
PyPDF2 handles PDF post-processing:
- Metadata management.
- Watermarks and background images.
- Password encryption.
- Document merging.
- Page manipulation.
PyPDF2 was deprecated in December 2022 and replaced by pypdf. The code examples in this tutorial still work with PyPDF2, but for new projects use pypdf instead. Most of the API is identical – the main change is import pypdf instead of import PyPDF2. One exception: PdfMerger was removed in pypdf 5.0; use PdfWriter.append() instead.
Step-by-Step Guide: Python HTML to PDF with WeasyPrint and PyPDF2
This section builds a recipe card generator that shows how to use these three libraries together to create printable PDF from HTML in Python.
Step 1: Set Up Your Environment
Prerequisites: Before you begin, make sure your Python development environment is ready for PDF generation.
| Requirement | Recommendation and Download Links |
|---|---|
| Python | Python – if not installed, download from Python.org. |
| Package Manager | Use pip (included with Python) for dependency management. |
| IDE | Any code editor like VS Code or PyCharm will do. |
- First, create a new project directory and navigate into it:
mkdir recipe-card-generator
cd recipe-card-generator
- Use
pipto install the necessary packages:
pip install weasyprint pypdf2 jinja2
WeasyPrint has system dependencies that vary by platform. For detailed installation instructions, visit the WeasyPrint Documentation.
Step 2: Set Up Your Project Directory Structure
Organize your project with a clean directory structure that separates content, style, and logic:
recipe-card-generator/
├── data/                           # Recipe data files
│   └── recipes.json                # Sample recipe data
├── templates/                      # HTML templates
│   └── recipe_card.html            # Recipe card template
├── static/
│   ├── css/
│   │   └── recipe_style.css        # CSS for recipe cards
│   ├── fonts/                      # Custom fonts (if needed)
│   │   └── OpenSans-Regular.ttf
│   └── img/                        # Image assets (if needed)
├── output/                         # Generated PDFs go here
├── recipe_generator.py             # Basic script
└── advance_recipe_generator.py     # Enhanced version with watermarks, metadata, etc.
Step 3: Create Your Jinja2 HTML Template
Create an HTML template using Jinja2 syntax for dynamic content. This template demonstrates Jinja2's features: variables, loops, and conditionals.
Save this as templates/recipe_card.html:
View code – recipe_card.html
<!DOCTYPE html>
<html lang="en">
<head>
    <meta charset="UTF-8">
    <title>{{ recipe.title }} | Recipe Card</title>
    <link rel="stylesheet" href="{{ css_path }}" type="text/css">
    <style>
        /* Theme-specific styles that need to be dynamic */
        .recipe-header {
            background-color: {{ theme_color }};
        }

        .section-title {
            color: {{ theme_color }};
        }
    </style>
</head>
<body>
<div class="recipe-card">
    <div class="recipe-header">
        <div class="recipe-title">{{ recipe.title }}</div>
        <div class="recipe-description">{{ recipe.description }}</div>
    </div>

    <div class="recipe-meta">
        <div class="meta-item">
            <span class="meta-value">{{ recipe.prep_time }} min</span>
            <span class="meta-label">Prep Time</span>
        </div>
        <div class="meta-item">
            <span class="meta-value">{{ recipe.cook_time }} min</span>
            <span class="meta-label">Cook Time</span>
        </div>
        <div class="meta-item">
            <span class="meta-value">{{ recipe.servings }}</span>
            <span class="meta-label">Servings</span>
        </div>
        <div class="meta-item">
            <span class="meta-value">{{ recipe.difficulty }}</span>
            <span class="meta-label">Difficulty</span>
        </div>
    </div>

    <div class="recipe-content">
        <div class="recipe-details full-width">
            <div class="section-title">Ingredients</div>
            <ul class="ingredients-list">
                {% for ingredient in recipe.ingredients %}
                <li>{{ ingredient }}</li>
                {% endfor %}
            </ul>

            <div class="section-title">Instructions</div>
            <ol class="instructions-list">
                {% for step in recipe.instructions %}
                <li>{{ step }}</li>
                {% endfor %}
            </ol>
        </div>
    </div>

    <div class="recipe-footer">
        <div class="recipe-tags">
            {% for tag in recipe.tags %}
            <span class="tag">{{ tag }}</span>
            {% endfor %}
        </div>
    </div>
</div>
</body>
</html>
Jinja2 template features used here:
- Use variables with
{{ variable_name }}syntax. - Loop through lists with
{% for item in items %}...{% endfor %}. - Add conditions with
{% if condition %}...{% endif %}. - Access nested data with dot notation.
Step 4: Create Your CSS File
The styling for the recipe cards goes into a separate CSS file. This separation from HTML follows best practices and makes maintenance easier.
Save this as static/css/recipe_style.css:
View code – recipe_style.css
:root {
    --card-border: #e0e0e0;
    --text-primary: #333;
    --text-secondary: #666;
    --text-light: #fff;
    --card-background: #f9f9f9;
    --tag-background: #e0e0e0;
}

@font-face {
    font-family: 'Open Sans';
    src: url('../fonts/OpenSans-Regular.ttf') format('truetype');
    font-weight: normal;
    font-style: normal;
}

body {
    font-family: 'Open Sans', Arial, sans-serif;
    margin: 0;
    padding: 0;
    color: var(--text-primary);
}

.recipe-card {
    width: 5in;
    height: 7in;
    margin: 0 auto;
    border: 1px solid var(--card-border);
    overflow: hidden;
    display: flex;
    flex-direction: column;
}

.recipe-header {
    text-align: center;
    padding: 20px;
    color: var(--text-light);
}

.recipe-title {
    font-size: 24px;
    font-weight: bold;
    margin-bottom: 5px;
}

.recipe-description {
    font-size: 14px;
    font-style: italic;
    margin-bottom: 10px;
}

.recipe-meta {
    display: flex;
    justify-content: space-around;
    padding: 15px;
    background-color: var(--card-background);
    border-bottom: 1px solid var(--card-border);
    font-size: 12px;
}

.meta-item {
    text-align: center;
}

.meta-value {
    font-weight: bold;
    display: block;
    margin-bottom: 5px;
}

.meta-label {
    color: var(--text-secondary);
    font-size: 10px;
    text-transform: uppercase;
}

.recipe-content {
    flex-grow: 1;
    padding: 15px 25px;
    overflow: auto;
}

.full-width {
    width: 100%;
}

.section-title {
    font-weight: bold;
    font-size: 14px;
    text-transform: uppercase;
    margin-top: 10px;
    margin-bottom: 10px;
    border-bottom: 1px solid var(--card-border);
    padding-bottom: 3px;
}

.ingredients-list {
    list-style-type: disc;
    padding-left: 20px;
    margin-top: 10px;
}

.ingredients-list li {
    padding: 3px 0;
    font-size: 12px;
}

.instructions-list {
    padding-left: 20px;
    margin-top: 10px;
}

.instructions-list li {
    padding: 3px 0;
    font-size: 12px;
    line-height: 1.4;
}

.recipe-footer {
    text-align: center;
    padding: 10px;
    font-size: 10px;
    color: var(--text-secondary);
    border-top: 1px solid var(--card-border);
    flex-shrink: 0;
}

.recipe-tags {
    margin-top: 5px;
}

.tag {
    display: inline-block;
    background-color: var(--tag-background);
    padding: 3px 8px;
    margin-right: 5px;
    border-radius: 10px;
    font-size: 9px;
    color: var(--text-primary);
}

/* Print-specific styles */
@media print {
    body {
        margin: 0;
        padding: 0;
    }

    .recipe-card {
        box-shadow: none;
        border: none;
    }

    @page {
        size: 5in 7in;
        margin: 0;
    }
}
Step 5: Create Sample Recipe Data
Add some sample recipe data.
Save this as data/recipes.json:
View example data
[
{
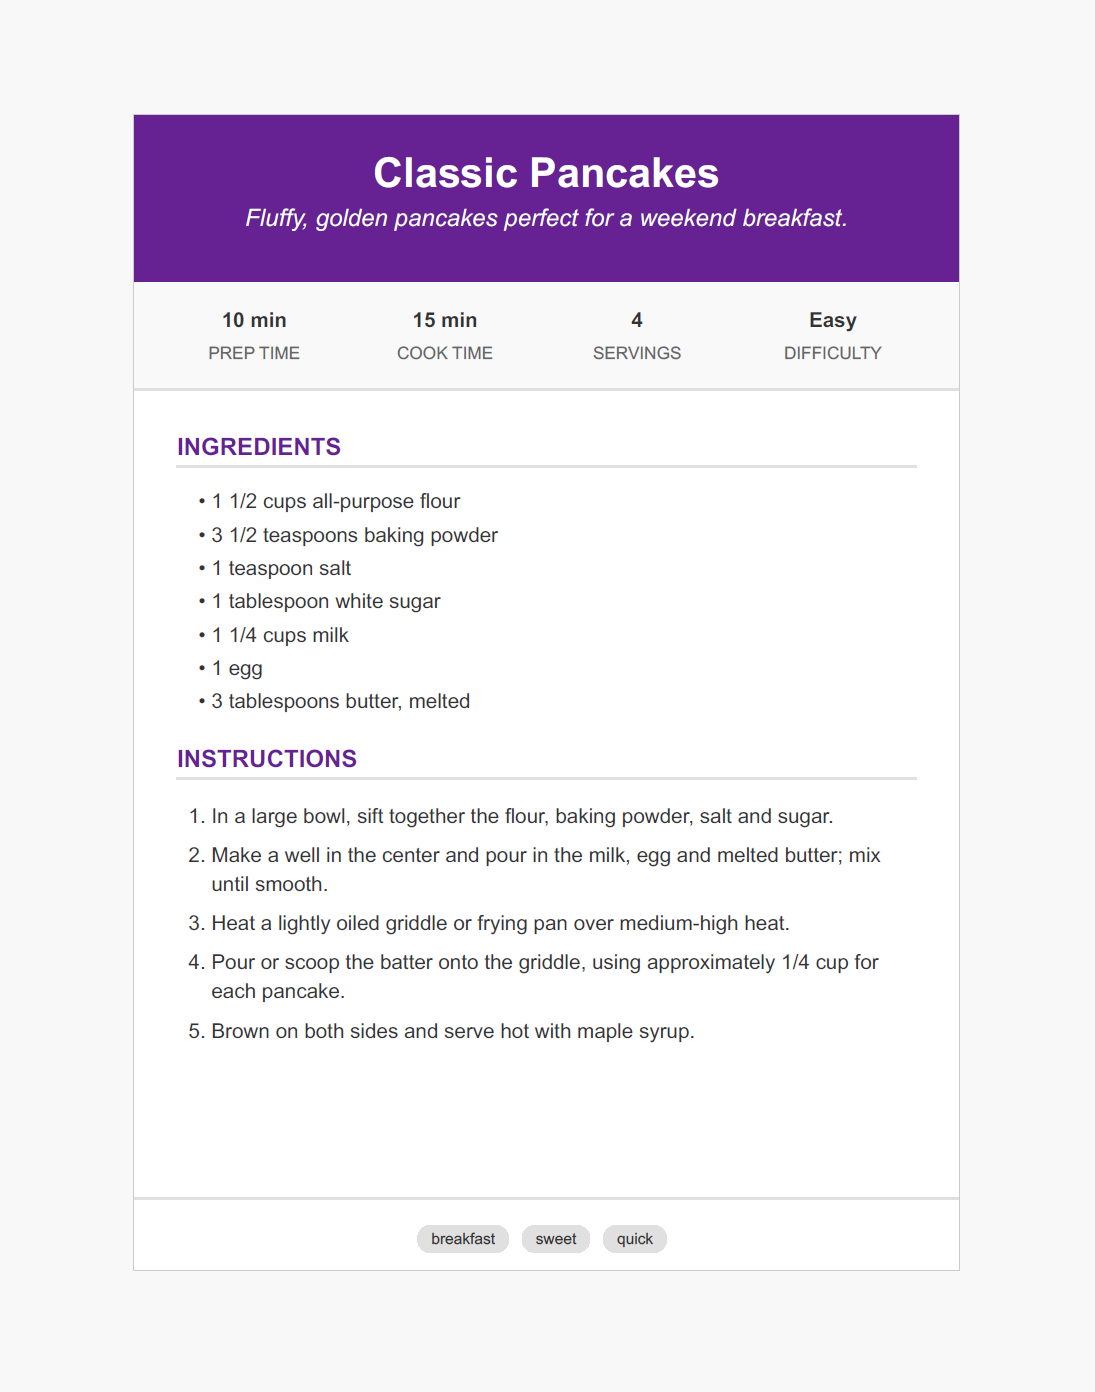
"title": "Classic Pancakes",
"description": "Fluffy, golden pancakes perfect for a weekend breakfast.",
"theme_color": "#662193",
"prep_time": 10,
"cook_time": 15,
"servings": 4,
"difficulty": "Easy",
"ingredients": [
"1 1/2 cups all-purpose flour",
"3 1/2 teaspoons baking powder",
"1 teaspoon salt",
"1 tablespoon white sugar",
"1 1/4 cups milk",
"1 egg",
"3 tablespoons butter, melted"
],
"instructions": [
"In a large bowl, sift together the flour, baking powder, salt and sugar.",
"Make a well in the center and pour in the milk, egg and melted butter; mix until smooth.",
"Heat a lightly oiled griddle or frying pan over medium-high heat.",
"Pour or scoop the batter onto the griddle, using approximately 1/4 cup for each pancake.",
"Brown on both sides and serve hot with maple syrup."
],
"tags": ["breakfast", "sweet", "quick"]
},
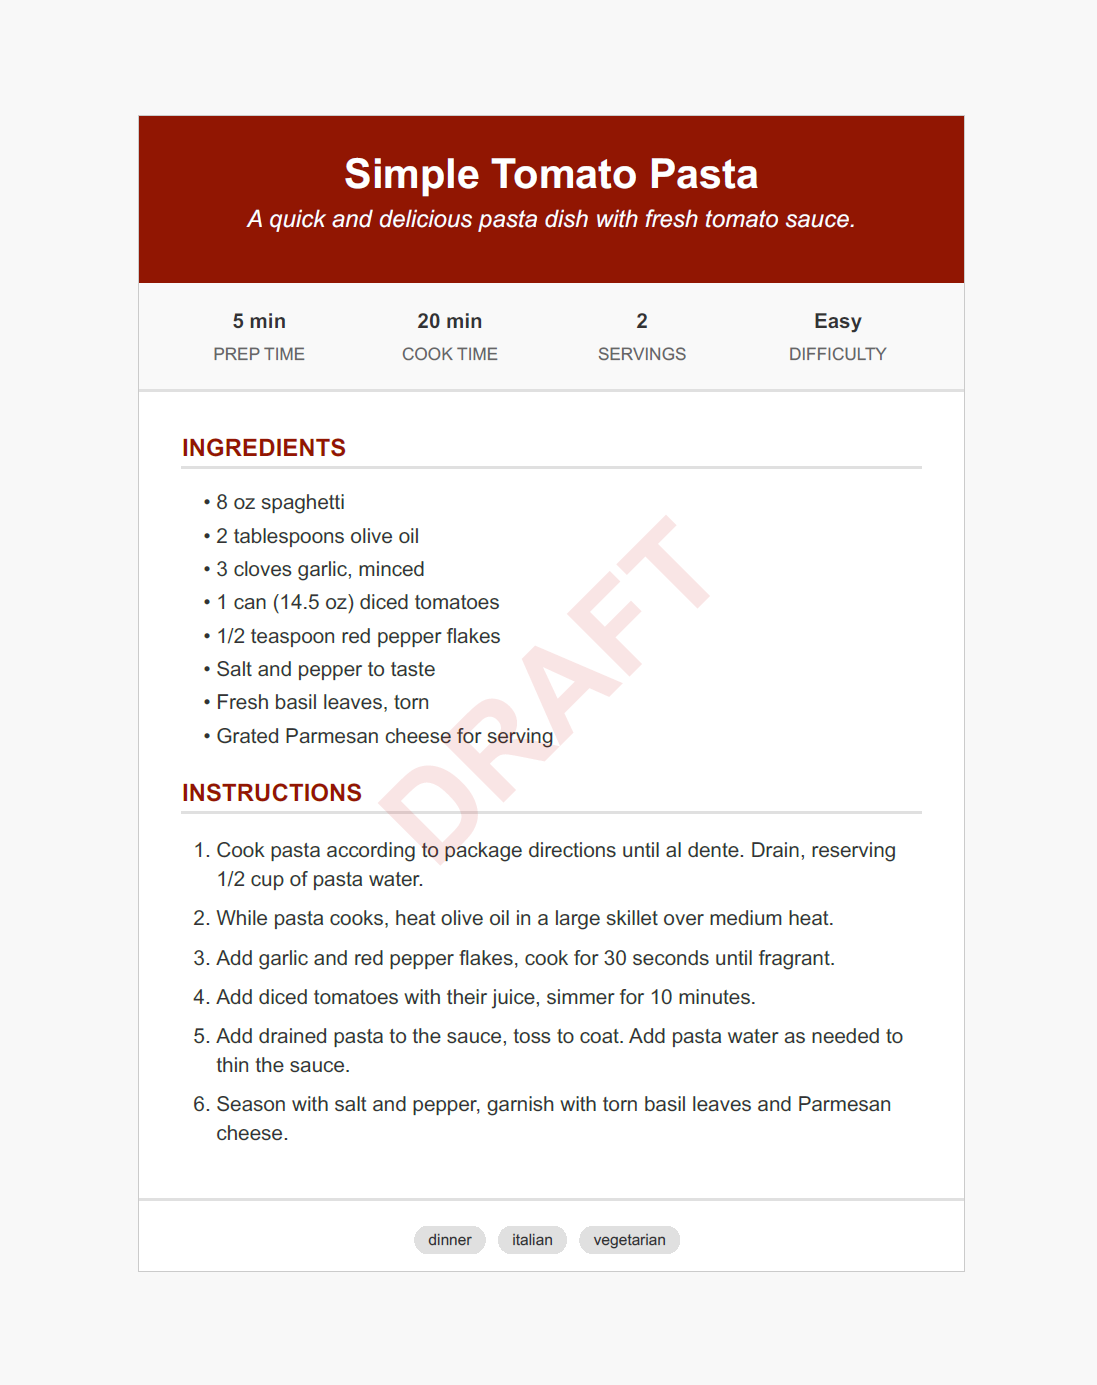
{
"title": "Simple Tomato Pasta",
"description": "A quick and delicious pasta dish with fresh tomato sauce.",
"theme_color": "#911602",
"prep_time": 5,
"cook_time": 20,
"servings": 2,
"difficulty": "Easy",
"ingredients": [
"8 oz spaghetti",
"2 tablespoons olive oil",
"3 cloves garlic, minced",
"1 can (14.5 oz) diced tomatoes",
"1/2 teaspoon red pepper flakes",
"Salt and pepper to taste",
"Fresh basil leaves, torn",
"Grated Parmesan cheese for serving"
],
"instructions": [
"Cook pasta according to package directions until al dente. Drain, reserving 1/2 cup of pasta water.",
"While pasta cooks, heat olive oil in a large skillet over medium heat.",
"Add garlic and red pepper flakes, cook for 30 seconds until fragrant.",
"Add diced tomatoes with their juice, simmer for 10 minutes.",
"Add drained pasta to the sauce, toss to coat. Add pasta water as needed to thin the sauce.",
"Season with salt and pepper, garnish with torn basil leaves and Parmesan cheese."
],
"tags": ["dinner", "italian", "vegetarian"]
}
]
Step 6: Create the PDF Generator Script
Next, create the main Python script that generates recipe cards as PDF.
Save this as recipe_generator.py:
View Code – recipe_generator.py
import os
import json
from jinja2 import Environment, FileSystemLoader
from weasyprint import HTML, CSS


class SimpleRecipeCardGenerator:
    def __init__(self, templates_dir="templates", static_dir="static", output_dir="output"):
        # Ensure output directory exists
        os.makedirs(output_dir, exist_ok=True)

        # Set up Jinja2 environment
        self.jinja_env = Environment(loader=FileSystemLoader(templates_dir))

        # Paths to static assets
        self.css_path = os.path.abspath(os.path.join(static_dir, "css", "recipe_style.css"))
        self.output_dir = output_dir

    def generate_recipe_card(self, recipe):
        # Generate filename
        recipe_title = recipe['title'].lower().replace(' ', '_')
        output_filename = f"{recipe_title}_card.pdf"
        output_path = os.path.join(self.output_dir, output_filename)

        # Default theme color if not provided
        theme_color = recipe.get('theme_color', "#4CAF50")

        # Prepare template context
        context = {
            'recipe': recipe,
            'theme_color': theme_color,
            'css_path': self.css_path
        }

        # Use Jinja2 to render HTML from template
        template = self.jinja_env.get_template('recipe_card.html')
        html_content = template.render(**context)

        # Use WeasyPrint to convert HTML to PDF with specified page size
        css = CSS(filename=self.css_path)
        HTML(string=html_content).write_pdf(
            output_path,
            stylesheets=[css],
            presentational_hints=True
        )

        print(f"Generated recipe card: {output_path}")
        return output_path


def main():
    # Initialize recipe card generator
    generator = SimpleRecipeCardGenerator()

    # Load recipes from JSON
    with open('data/recipes.json', 'r', encoding='utf-8') as file:
        recipes = json.load(file)

    # Generate PDF for the example recipe
    if recipes:
        generator.generate_recipe_card(recipes[0])
    else:
        print("No recipes found in the JSON file.")

if __name__ == "__main__":
    main()
Step 7: Run Your PDF Generator
Now you're ready to run your recipe card generator:
python recipe_generator.py
This script will:
- Load the recipes from your JSON file.
- Use Jinja2 to render HTML templates.
- Use WeasyPrint to convert HTML to PDF.
Step 8: Examine the Results
After running the script, check your output directory.
You should see a file named classic_pancakes_card.pdf in your output folder. Open it to preview your generated recipe card. This is just a basic example of what you can achieve.
I hope you like pancakes! 🥞
Advanced PDF Manipulation with PyPDF2
While WeasyPrint handles HTML to PDF conversion, PyPDF2 adds post-processing capabilities to your generated documents: watermarks, merging, metadata, and encryption.
Adding Watermark
Watermarks can be used for branding, draft indicators, or confidentiality markers. The technique involves creating a separate PDF with just the watermark, then merging it with each page of your target document.
View code – Add watermark to PDF
def create_watermark(self, watermark_text="DRAFT"):
    # Create a watermark PDF
    watermark_html = f"""
    <!DOCTYPE html>
    <html>
    <head>
        <style>
            @page {{
                size: 5in 7in;
            }}
            body {{
                display: flex;
                justify-content: center;
                align-items: center;
                height: 100vh;
                font-family: Arial, sans-serif;
            }}
            .watermark {{
                position: absolute;
                top: 50%;
                left: 50%;
                transform: translate(-50%, -50%) rotate(-45deg);
                font-size: 72px;
                color: rgba(200, 0, 0, 0.1);
                text-transform: uppercase;
                font-weight: bold;
                text-align: center;
                white-space: nowrap;
            }}
        </style>
    </head>
    <body>
        <div class="watermark">{watermark_text}</div>
    </body>
    </html>
    """

    # Generate temporary watermark PDF
    temp_watermark_path = os.path.join(self.output_dir, "temp_watermark.pdf")
    HTML(string=watermark_html).write_pdf(temp_watermark_path)

    return temp_watermark_path

def add_watermark(self, input_pdf_path, output_pdf_path, watermark_text="DRAFT"):
    # Create watermark PDF
    temp_watermark_path = self.create_watermark(watermark_text)

    # Use PyPDF2 to apply watermark
    try:
        with open(input_pdf_path, "rb") as input_file:
            reader = PyPDF2.PdfReader(input_file)
            writer = PyPDF2.PdfWriter()

            # Open the watermark PDF
            with open(temp_watermark_path, "rb") as watermark_file:
                watermark_reader = PyPDF2.PdfReader(watermark_file)
                watermark_page = watermark_reader.pages[0]

                # Apply watermark to each page
                for page_num in range(len(reader.pages)):
                    page = reader.pages[page_num]
                    page.merge_page(watermark_page)
                    writer.add_page(page)

                # Write the result to output file
                with open(output_pdf_path, "wb") as output_file:
                    writer.write(output_file)

        # Remove temporary watermark file
        os.remove(temp_watermark_path)

        print(f"Added watermark to PDF: {output_pdf_path}")
        return output_pdf_path

    except Exception as e:
        print(f"Error adding watermark: {e}")
        return None
This approach first creates a watermark PDF using WeasyPrint, then uses PyPDF2 to merge it with each page of your target document. The watermark is positioned in the center and rotated 45 degrees for that classic watermark look.
Generated PDF with watermark applied:
Merging Multiple PDFs
Combining multiple recipe cards or documents into a single PDF is straightforward with PyPDF2. This is useful for creating collections, catalogs, or compilations.
View code
def merge_pdfs(self, pdf_paths, output_path):
    # Create a PDF merger
    merger = PyPDF2.PdfMerger()

    # Append each PDF
    for pdf_path in pdf_paths:
        merger.append(pdf_path)

    # Write merged PDF
    with open(output_path, 'wb') as merged_file:
        merger.write(merged_file)

    print(f"Merged PDFs into: {output_path}")
    return output_path
The PdfMerger class from PyPDF2 combines any number of PDFs in the order you specify.
Adding Metadata
Adding metadata to your PDF makes it searchable and helps PDF readers categorize documents.
View code
def add_metadata(self, input_pdf_path, output_pdf_path, metadata=None):
    # Default metadata if none provided
    if metadata is None:
        metadata = {
            '/Title': 'Recipe Collection',
            '/Author': 'Culinary Creator',
            '/Subject': 'Cooking Recipes',
            '/Keywords': 'recipes, cooking, food',
            '/Creator': 'PDF Generator',
        }

    # Add metadata using PyPDF2
    with open(input_pdf_path, "rb") as file:
        reader = PyPDF2.PdfReader(file)
        writer = PyPDF2.PdfWriter()

        # Copy pages
        for page in reader.pages:
            writer.add_page(page)

        # Add metadata
        writer.add_metadata(metadata)

        # Write PDF with metadata
        with open(output_pdf_path, "wb") as output_file:
            writer.write(output_file)

    print(f"Added metadata to PDF: {output_pdf_path}")
    return output_pdf_path
This function adds standard PDF metadata fields like title, author, and keywords, which are used by search engines and PDF readers to categorize and find documents.
Encrypting PDF
For sensitive documents, PyPDF2 provides easy password protection.
View code
def encrypt_pdf(self, input_pdf_path, output_pdf_path, user_password, owner_password=None):
    # If owner_password is not provided, use user_password
    if owner_password is None:
        owner_password = user_password

    with open(input_pdf_path, "rb") as file:
        reader = PyPDF2.PdfReader(file)
        writer = PyPDF2.PdfWriter()

        # Copy pages
        for page in reader.pages:
            writer.add_page(page)

        # Encrypt the PDF
        writer.encrypt(user_password, owner_password)

        # Write encrypted PDF
        with open(output_pdf_path, "wb") as output_file:
            writer.write(output_file)

    print(f"Encrypted PDF saved as: {output_pdf_path}")
    return output_pdf_path
PDF encryption in PyPDF2 supports two different passwords:
- The user password is required to open the document.
- The owner password grants additional permissions like printing or editing.
Complete Recipe Card Generator
Complete code for the advanced recipe card generator:
View complete code
import os
import json
from jinja2 import Environment, FileSystemLoader
from weasyprint import HTML, CSS
import PyPDF2


class RecipeCardGenerator:
    def __init__(self, templates_dir="templates", static_dir="static", output_dir="output"):
        # Ensure output directory exists
        os.makedirs(output_dir, exist_ok=True)

        # Set up Jinja2 environment
        self.jinja_env = Environment(loader=FileSystemLoader(templates_dir))

        # Paths to static assets
        self.css_path = os.path.abspath(os.path.join(static_dir, "css", "recipe_style.css"))
        self.output_dir = output_dir

    def generate_recipe_card(self, recipe):
        # Generate filename
        recipe_title = recipe['title'].lower().replace(' ', '_')
        output_filename = f"{recipe_title}_card.pdf"
        output_path = os.path.join(self.output_dir, output_filename)

        # Default theme color if not provided
        theme_color = recipe.get('theme_color', "#4CAF50")

        # Prepare template context
        context = {
            'recipe': recipe,
            'theme_color': theme_color,
            'css_path': self.css_path
        }

        # Use Jinja2 to render HTML from template
        template = self.jinja_env.get_template('recipe_card.html')
        html_content = template.render(**context)

        # Use WeasyPrint to convert HTML to PDF with specified page size
        css = CSS(filename=self.css_path)
        HTML(string=html_content).write_pdf(
            output_path,
            stylesheets=[css],
            presentational_hints=True
        )

        print(f"Generated recipe card: {output_path}")
        return output_path

    def create_watermark(self, watermark_text="DRAFT"):
        # Create a watermark PDF
        watermark_html = f"""
        <!DOCTYPE html>
        <html>
        <head>
            <style>
                @page {{
                    size: 5in 7in;
                }}
                body {{
                    display: flex;
                    justify-content: center;
                    align-items: center;
                    height: 100vh;
                    font-family: Arial, sans-serif;
                }}
                .watermark {{
                    position: absolute;
                    top: 50%;
                    left: 50%;
                    transform: translate(-50%, -50%) rotate(-45deg);
                    font-size: 72px;
                    color: rgba(200, 0, 0, 0.1);
                    text-transform: uppercase;
                    font-weight: bold;
                    text-align: center;
                    white-space: nowrap;
                }}
            </style>
        </head>
        <body>
            <div class="watermark">{watermark_text}</div>
        </body>
        </html>
        """

        # Generate temporary watermark PDF
        temp_watermark_path = os.path.join(self.output_dir, "temp_watermark.pdf")
        HTML(string=watermark_html).write_pdf(temp_watermark_path)

        return temp_watermark_path

    def add_watermark(self, input_pdf_path, output_pdf_path, watermark_text="DRAFT"):
        # Create watermark PDF
        temp_watermark_path = self.create_watermark(watermark_text)

        # Use PyPDF2 to apply watermark
        try:
            with open(input_pdf_path, "rb") as input_file:
                reader = PyPDF2.PdfReader(input_file)
                writer = PyPDF2.PdfWriter()

                # Open the watermark PDF
                with open(temp_watermark_path, "rb") as watermark_file:
                    watermark_reader = PyPDF2.PdfReader(watermark_file)
                    watermark_page = watermark_reader.pages[0]

                    # Apply watermark to each page
                    for page_num in range(len(reader.pages)):
                        page = reader.pages[page_num]
                        page.merge_page(watermark_page)
                        writer.add_page(page)

                    # Write the result to output file
                    with open(output_pdf_path, "wb") as output_file:
                        writer.write(output_file)

            # Remove temporary watermark file
            os.remove(temp_watermark_path)

            print(f"Added watermark to PDF: {output_pdf_path}")
            return output_pdf_path

        except Exception as e:
            print(f"Error adding watermark: {e}")
            return None

    def merge_pdfs(self, pdf_paths, output_path):
        # Create a PDF merger
        merger = PyPDF2.PdfMerger()

        # Append each PDF
        for pdf_path in pdf_paths:
            merger.append(pdf_path)

        # Write merged PDF
        with open(output_path, 'wb') as merged_file:
            merger.write(merged_file)

        print(f"Merged PDFs into: {output_path}")
        return output_path

    def add_metadata(self, input_pdf_path, output_pdf_path, metadata=None):
        # Default metadata if none provided
        if metadata is None:
            metadata = {
                '/Title': 'Recipe Collection',
                '/Author': 'Culinary Creator',
                '/Subject': 'Cooking Recipes',
                '/Keywords': 'recipes, cooking, food',
                '/Creator': 'PDF Generator',
            }

        # Add metadata using PyPDF2
        with open(input_pdf_path, "rb") as file:
            reader = PyPDF2.PdfReader(file)
            writer = PyPDF2.PdfWriter()

            # Copy pages
            for page in reader.pages:
                writer.add_page(page)

            # Add metadata
            writer.add_metadata(metadata)

            # Write PDF with metadata
            with open(output_pdf_path, "wb") as output_file:
                writer.write(output_file)

        print(f"Added metadata to PDF: {output_pdf_path}")
        return output_pdf_path

    def encrypt_pdf(self, input_pdf_path, output_pdf_path, user_password, owner_password=None):
        # If owner_password is not provided, use user_password
        if owner_password is None:
            owner_password = user_password

        with open(input_pdf_path, "rb") as file:
            reader = PyPDF2.PdfReader(file)
            writer = PyPDF2.PdfWriter()

            # Copy pages
            for page in reader.pages:
                writer.add_page(page)

            # Encrypt the PDF
            writer.encrypt(user_password, owner_password)

            # Write encrypted PDF
            with open(output_pdf_path, "wb") as output_file:
                writer.write(output_file)

        print(f"Encrypted PDF saved as: {output_pdf_path}")
        return output_pdf_path

    def process_recipe_collection(self, recipes):
        processed_pdfs = []

        for recipe in recipes:
            # Generate recipe card
            pdf_path = self.generate_recipe_card(recipe)

            # Generate output path for watermarked PDF
            base_name = recipe['title'].lower().replace(' ', '_')
            watermark_path = os.path.join(self.output_dir, f"{base_name}_watermark.pdf")

            # Add watermark with text "DRAFT"
            watermark_path = self.add_watermark(
                pdf_path,
                watermark_path,
                watermark_text="DRAFT"  # Always use "DRAFT" as the watermark text
            )

            # Prepare metadata
            metadata = {
                '/Title': recipe['title'],
                '/Author': 'Recipe Card Generator',
                '/Subject': 'Cooking Recipe',
                '/Keywords': ', '.join(recipe.get('tags', [])),
                '/Creator': 'PDF Recipe Generator'
            }

            # Add metadata to the same watermarked file (overwriting it)
            self.add_metadata(
                watermark_path,
                watermark_path,  # Same file - overwrite
                metadata=metadata
            )

            processed_pdfs.append(watermark_path)

        # Merge all processed PDFs
        collection_path = os.path.join(self.output_dir, "recipe_collection.pdf")
        self.merge_pdfs(processed_pdfs, collection_path)

        # Optionally encrypt the collection
        encrypted_path = os.path.join(self.output_dir, "recipe_collection_protected.pdf")
        self.encrypt_pdf(collection_path, encrypted_path, "recipe123")

        return {
            "individual_recipes": processed_pdfs,
            "collection": collection_path,
            "encrypted_collection": encrypted_path
        }


def main():
    # Initialize recipe card generator
    generator = RecipeCardGenerator()

    # Load recipes from JSON
    with open('data/recipes.json', 'r', encoding='utf-8') as file:
        recipes = json.load(file)

    # Process all recipes
    if recipes:
        result = generator.process_recipe_collection(recipes)
        print("\nGeneration complete!")
        print(f"Recipe collection available at: {result['collection']}")
        print(f"Encrypted collection available at: {result['encrypted_collection']}")
    else:
        print("No recipes found in the JSON file.")


if __name__ == "__main__":
    main()
Running the Advanced Recipe Card Generator
Save the complete code from the previous section as advance_recipe_generator.py.
Then execute it with:
python advance_recipe_generator.py
This will:
- Generate individual recipe cards from your JSON data.
- Add watermarks to each card.
- Embed recipe-specific metadata.
- Combine all cards into a single PDF collection.
- Create a password-protected version of the collection.
When the script finishes execution, you should see output messages confirming each step of the process. Check your output directory to find all the generated files, including the individual recipe cards with watermarks, the merged collection, and the encrypted version.
Alternative: HTML to PDF API
The WeasyPrint, Jinja2, and PyPDF2 combination gives you full control over Python PDF generation. But managing these dependencies and their system requirements can get complicated as your application grows. Cloud-based PDF generation APIs are an alternative worth considering.
PDFBolt is a REST API that handles HTML to PDF conversion without local dependencies, using the same template-driven approach shown in this tutorial.
Generate the same result with an API call:
Step 1: Template Design:
- Create your recipe card layout using PDFBolt's visual template designer – with HTML and CSS, same as the example above.
- Use familiar templating syntax (Handlebars, similar to Jinja2) for dynamic content.
- Preview and test your design with sample data directly in the app.
- Publish your template and copy the template ID.
Step 2: Python Integration
- Check out the Quick Start Guide for ready-to-use code examples, or copy snippets directly from the app using the Get API Code button.
- Add your data to the
templateDataobject.
View the Code – Generate Recipe Cards via API
import requests
import json

url = "https://api.pdfbolt.com/v1/direct"
headers = {
    "API-KEY": "XXXXXXXX-XXXX-XXXX-XXXX-XXXXXXXXXXXX",
    "Content-Type": "application/json"
}

data_json = '''{
    "templateId": "your-template-id",
     "templateData": {
        "recipe_title": "Classic Pancakes",
        "description": "Fluffy, golden pancakes perfect for a weekend breakfast.",
        "theme_color": "#662193",
        "prep_time": 10,
        "cook_time": 15,
        "servings": 4,
        "difficulty": "Easy",
        "ingredients": [
            "1 1/2 cups all-purpose flour",
            "3 1/2 teaspoons baking powder",
            "1 teaspoon salt",
            "1 tablespoon white sugar",
            "1 1/4 cups milk",
            "1 egg",
            "3 tablespoons butter, melted"
        ],
        "instructions": [
            "In a large bowl, sift together the flour, baking powder, salt and sugar.",
            "Make a well in the center and pour in the milk, egg and melted butter; mix until smooth.",
            "Heat a lightly oiled griddle or frying pan over medium-high heat.",
            "Pour or scoop the batter onto the griddle, using approximately 1/4 cup for each pancake.",
            "Brown on both sides and serve hot with maple syrup."
        ],
        "tags": ["breakfast", "sweet", "quick"]
    }
}'''

data = json.loads(data_json)

try:
    response = requests.post(url, headers=headers, json=data)
    response.raise_for_status()

    with open('recipe_cards_pdfbolt.pdf', 'wb') as f:
        f.write(response.content)
    print("PDF generated successfully")

except requests.exceptions.HTTPError as e:
    print(f"HTTP {response.status_code}")
    print(f"Error Message: {response.text}")
except requests.exceptions.RequestException as e:
    print(f"Error: {e}")
With the API approach, you send a template ID and data, and get a PDF back. No local dependencies to manage.
Learn more about PDFBolt’s PDF generation API:
- Complete Documentation – Full reference for all API endpoints, parameters, and functionality.
- Template Guide – Step-by-step instructions for creating and managing templates.
WeasyPrint uses its own CSS engine which may not support all modern styles and JavaScript. For full browser rendering, PDFBolt HTML to PDF API uses headless Chrome so pages look exactly as they do in the browser.
Conclusion
WeasyPrint, Jinja2, and PyPDF2 cover the full Python HTML to PDF pipeline: Jinja2 handles templating, WeasyPrint renders HTML and CSS to PDF, and PyPDF2 adds watermarks, merging, metadata, and encryption. The recipe card generator in this tutorial shows how to connect all three into a working Python PDF generation workflow.
For projects where managing local dependencies is not practical, an HTML to PDF API can handle the conversion server-side.
If you're working with other Python PDF libraries, check out the guides on pdfkit, xhtml2pdf, and other Python HTML to PDF options.
Happy coding and happy cooking! 🍕