HTML to PDF in C# with PuppeteerSharp: Complete Guide

Looking for a reliable way to convert HTML to PDF in C# and .NET? This guide shows you how to use PuppeteerSharp, the .NET port of the Node.js Puppeteer library, to generate PDFs from dynamic HTML content. Whether you're building invoices, reports, or print-ready web pages, PuppeteerSharp gives you full control over headless Chromium rendering, enabling pixel-perfect PDF output using modern HTML and CSS. This guide covers setting up a C#/.NET project, using a template engine for dynamic content, and exporting an invoice PDF as the final result.
What is PuppeteerSharp?
PuppeteerSharp is a .NET library that provides a full API for controlling Chrome or Chromium browsers. As a port of Google's Puppeteer library, it brings the same browser automation capabilities to the .NET ecosystem. PuppeteerSharp operates in headless mode by default – running without a visible browser interface – while also supporting full browser environments when needed.
PuppeteerSharp handles web automation, testing, content scraping, screenshot capture, and HTML to PDF conversion, covering most browser-based tasks within .NET applications.
Why Choose PuppeteerSharp for PDF Generation?
PuppeteerSharp offers several benefits for converting HTML into PDFs:
- Modern Rendering Engine: Fully supports CSS3, JavaScript, and dynamic content rendering.
- Highly Configurable: Easily adjust margins, headers, footers, and apply custom styling.
- JavaScript Support: Executes JavaScript code to capture dynamic and interactive elements.
- Open-Source Solution: A cost-effective alternative to commercial PDF generation tools.
- .NET Integration: Works directly with .NET applications with minimal configuration.
Step-by-Step Guide: Creating a PDF with PuppeteerSharp
Step 1: Set Up Your Environment
Before starting the implementation, make sure you have these prerequisites installed:
- Your preferred .NET development environment - Visual Studio, Visual Studio Code or Rider.
For this tutorial, I'm using JetBrains Rider. - .NET 8.0 or .NET 9.0 - Available from Microsoft's .NET download page.
- Git (optional) - For source code management.
To confirm your .NET setup is ready, open a terminal or command prompt and run:
dotnet --version
Step 2: Create a New .NET Project
Start by creating a new .NET console application:
Create a new directory for your project:
mkdir HtmlToPdfConverter
cd HtmlToPdfConverter
Create a new console application:
dotnet new console
This creates a basic console application with a Program.cs file.
Step 3: Set Up Your Project Directory Structure
For better organization, create a directory structure like this:
HtmlToPdfConverter/
│
├── Program.cs               # Application entry point
│
├── Templates/               # Contains HTML/Razor templates
│   └── Invoice.cshtml       # Invoice template file
│
├── Output/                  # Generated PDFs will be saved here
│   └── (PDF files)
│
├── Models/                  # Data models
│   └── InvoiceModel.cs      # Invoice data structure
│
└── Services/                # Optional - for service classes
    ├── TemplateService.cs   # Template rendering service
    └── PdfService.cs        # PDF generation service
This structure organizes your project into logical components, making it easier to manage as your application grows.
Step 4: Install Required NuGet Packages
We need two NuGet packages:
- Install PuppeteerSharp for HTML to PDF conversion:
dotnet add package PuppeteerSharp
- Install Razor for template rendering:
dotnet add package RazorLight
Step 5: Create a Model for the Invoice
Let's create a simple data model for our invoice. Create a file named InvoiceModel.cs in the Models directory:
namespace HtmlToPdfConverter.Models
{
    public class InvoiceModel
    {
        public string InvoiceNumber { get; set; }
        public DateTime InvoiceDate { get; set; }
        public DateTime DueDate { get; set; }
        public string CompanyName { get; set; }
        public string CompanyAddress { get; set; }
        public string CompanyEmail { get; set; }
        public string CompanyPhone { get; set; }
        public string CompanyLogo { get; set; }
        public string ClientName { get; set; }
        public string ClientAddress { get; set; }
        public string ClientEmail { get; set; }
        public decimal SubTotal => Items.Sum(item => item.Total);
        public decimal TaxRate { get; set; }
        public decimal TaxAmount => Math.Round(SubTotal * (TaxRate / 100), 2);
        public decimal Total => SubTotal + TaxAmount;
        public string Currency { get; set; } = "$";
        public List<InvoiceItem> Items { get; set; } = new List<InvoiceItem>();
        public string Notes { get; set; }
        public string PaymentTerms { get; set; }
    }

    public class InvoiceItem
    {
        public string Description { get; set; }
        public int Quantity { get; set; }
        public decimal UnitPrice { get; set; }
        public decimal Total => Quantity * UnitPrice;
    }
}
Step 6: Create a Razor Template
Now, let's build an invoice template using Razor syntax. This template defines the visual structure of our PDF.
Razor is a markup syntax for embedding .NET based code into webpages. In our PDF generation process, we use it to create templates that can be populated with dynamic data – design the invoice once, then fill it with different customer information each time. For a broader comparison of template engines across languages, see Top HTML Template Engines for Dynamic PDF Generation.
Learn more about Razor at Microsoft's official documentation.
Create a file named Invoice.cshtml in the Templates directory:
Click to view the complete Razor template
@model HtmlToPdfConverter.Models.InvoiceModel
<!DOCTYPE html>
<html lang="en">
<head>
    <meta charset="UTF-8">
    <meta name="viewport" content="width=device-width, initial-scale=1.0">
    <title>Invoice @Model.InvoiceNumber</title>
    <style>
        @@page {
            size: 8.5in 11in;
            margin: 0;
        }

        body {
            font-family: 'Segoe UI', Tahoma, Geneva, Verdana, sans-serif;
            margin: 0;
            padding: 0;
            color: #333;
            background-color: #fff;
        }

        .invoice-container {
            max-width: 800px;
            margin: 0 auto;
            padding: 10px 50px;
        }

        .invoice-header {
            display: flex;
            justify-content: space-between;
            margin-bottom: 10px;
            border-bottom: 2px solid #eaeaea;
        }

        .company-details {
            text-align: right;
        }

        .company-details h2 {
            color: #2c3e50;
            margin-bottom: 10px;
        }

        .invoice-details {
            margin-bottom: 20px;
            display: flex;
            justify-content: space-between;
        }

        .client-details, .invoice-info {
            flex-basis: 48%;
        }

        .invoice-header h2 {
            color: #3498db;
            font-size: 34px;
            margin-bottom: 15px;
        }

        .client-details h3 {
            color: #2c3e50;
            margin-bottom: 15px;
        }

        .invoice-table {
            width: 100%;
            border-collapse: collapse;
            margin-bottom: 20px;
        }

        .invoice-table th {
            background-color: #3498db;
            color: white;
            text-align: left;
            padding: 12px 15px;
            border-bottom: 1px solid #ddd;
        }

        .invoice-table td {
            padding: 12px 15px;
            border-bottom: 1px solid #ddd;
        }

        .invoice-table tr:nth-child(even) {
            background-color: #f8f9fa;
        }

        .summary {
            display: flex;
            justify-content: flex-end;
            margin-bottom: 20px;
        }

        .summary-table {
            width: 300px;
            border-collapse: collapse;
        }

        .summary-table td {
            padding: 10px;
            border-bottom: 1px solid #ddd;
        }

        .summary-table .total {
            font-weight: bold;
            font-size: 1.2em;
            background-color: #f8f9fa;
        }

        .notes {
            margin-top: 20px;
            padding: 20px;
            background-color: #f8f9fa;
            border-left: 4px solid #3498db;
        }

        .notes h3 {
            margin-top: 0;
            color: #2c3e50;
        }

        .logo {
            max-height: 80px;
        }

        .text-right {
            text-align: right;
        }

        .footer {
            margin-top: 30px;
            text-align: center;
            font-size: 0.9em;
            color: #7f8c8d;
            border-top: 1px solid #eaeaea;
            padding-top: 20px;
        }
    </style>
</head>
<body>
<div class="invoice-container">
    <div class="invoice-header">
        <div>
            @if (!string.IsNullOrEmpty(Model.CompanyLogo))
            {
                <img src="@Model.CompanyLogo" alt="Company Logo" class="logo">
            }
            else
            {
                <h1>@Model.CompanyName</h1>
            }
            <h2>INVOICE</h2>
        </div>
        <div class="company-details">
            <h3>@Model.CompanyName</h3>
            <p>@Model.CompanyAddress</p>
            <p>@Model.CompanyEmail</p>
            <p>@Model.CompanyPhone</p>
        </div>
    </div>

    <div class="invoice-details">
        <div class="invoice-info">
            <p><strong>Invoice Number:</strong> @Model.InvoiceNumber</p>
             <p><strong>Invoice Date:</strong> @Model.InvoiceDate.ToString("MMMM dd, yyyy", System.Globalization.CultureInfo.InvariantCulture)</p>
             <p><strong>Due Date:</strong> @Model.DueDate.ToString("MMMM dd, yyyy", System.Globalization.CultureInfo.InvariantCulture)</p>
        </div>
        <div class="client-details">
            <h3>Bill To:</h3>
            <p><strong>@Model.ClientName</strong></p>
            <p>@Model.ClientAddress</p>
            <p>@Model.ClientEmail</p>
        </div>
    </div>

    <table class="invoice-table">
        <thead>
        <tr>
            <th>Description</th>
            <th>Quantity</th>
            <th>Unit Price</th>
            <th>Total</th>
        </tr>
        </thead>
        <tbody>
        @foreach (var item in Model.Items)
        {
        <tr>
            <td>@item.Description</td>
            <td>@item.Quantity</td>
            <td>@[email protected]("0.00")</td>
            <td>@[email protected]("0.00")</td>
        </tr>
        }
        </tbody>
    </table>

    <div class="summary">
        <table class="summary-table">
            <tr>
                <td>Subtotal</td>
                <td class="text-right">@[email protected]("0.00")</td>
            </tr>
            <tr>
                <td>Tax (@Model.TaxRate%)</td>
                <td class="text-right">@[email protected]("0.00")</td>
            </tr>
            <tr class="total">
                <td>Total</td>
                <td class="text-right">@[email protected]("0.00")</td>
            </tr>
        </table>
    </div>

    <div class="notes">
        <h3>Notes</h3>
        <p>@Model.Notes</p>
    </div>

    <div class="footer">
        <p>Thank you for your business!</p>
        <p>For questions about this invoice, please contact us at @Model.CompanyEmail</p>
    </div>
</div>
</body>
</html>
This template:
- Uses modern CSS styling to create a clean invoice layout.
- Includes sections for company details, client information, itemized charges, and payment terms.
- Contains Razor placeholders (like
@Model.PropertyName) that automatically get replaced with actual invoice data.
Step 7: Create a Template Engine Service
Next, create a service that renders our Razor template with data.
Create a file named TemplateService.cs in Services directory:
using RazorLight;
using RazorLight.Compilation;

namespace HtmlToPdfConverter
{
    public class TemplateService
    {
        private readonly RazorLightEngine _engine;

        public TemplateService()
        {
            _engine = new RazorLightEngineBuilder()
                .UseFileSystemProject(Directory.GetCurrentDirectory())
                .UseMemoryCachingProvider()
                .Build();
        }

        public async Task<string> RenderTemplateAsync<T>(string templatePath, T model)
        {
            try
            {
                string template = await File.ReadAllTextAsync(templatePath);
                string result = await _engine.CompileRenderStringAsync(
                    GetHashString(templatePath),
                    template,
                    model
                );
                return result;
            }
            catch (TemplateCompilationException ex)
            {
                Console.WriteLine($"Template compilation error: {ex.Message}");
                foreach (var error in ex.CompilationErrors)
                {
                    Console.WriteLine($"- {error}");
                }

                throw;
            }
            catch (Exception ex)
            {
                Console.WriteLine($"Template rendering error: {ex.Message}");
                throw;
            }
        }

        private static string GetHashString(string text)
        {
            using (var sha = System.Security.Cryptography.SHA256.Create())
            {
                var bytes = System.Text.Encoding.UTF8.GetBytes(text);
                var hash = sha.ComputeHash(bytes);
                return Convert.ToBase64String(hash);
            }
        }
    }
}
Step 8: Create a PDF Generation Service Using PuppeteerSharp
Now, build a service that handles the HTML to PDF conversion using PuppeteerSharp.
Create a file named PdfService.cs in Services directory:
Click to view the PDF generation service code
using PuppeteerSharp;
using PuppeteerSharp.Media;

namespace HtmlToPdfConverter
{
    public class PdfService
    {
        private readonly string _browserExecutablePath;

        public PdfService(string? browserExecutablePath = null)
        {
            _browserExecutablePath = browserExecutablePath;
        }

        // Converts HTML content to PDF and saves it to the specified path
        public async Task<string> GeneratePdfFromHtmlAsync(
            string html,
            string outputPath,
            PaperFormat paperFormat,
            bool landscape = false)
        {
            // Launch or connect to browser
            var browser = await SetupBrowserAsync();

            try
            {
                // Create a new page
                using var page = await browser.NewPageAsync();

                // Set the HTML content and wait for all resources to load
                await page.SetContentAsync(html, new NavigationOptions
                {
                    WaitUntil = new[] { WaitUntilNavigation.Networkidle0 }
                });


                // Configure PDF generation options
                var pdfOptions = new PdfOptions
                {
                    Format = paperFormat,          // Standard paper size
                    Landscape = landscape,         // Page orientation
                    PrintBackground = true,        // Include background colors/images
                    MarginOptions = new MarginOptions
                    {
                        Top = "10px",
                        Right = "20px",
                        Bottom = "10px",
                        Left = "20px"
                    }
                };

                // Generate and save the PDF
                await page.PdfAsync(outputPath, pdfOptions);

                Console.WriteLine($"PDF successfully generated at: {outputPath}");
                return outputPath;
            }
            catch (Exception ex)
            {
                Console.WriteLine($"Error generating PDF: {ex.Message}");
                throw;
            }
            finally
            {
                // Always close the browser to free resources
                await browser.CloseAsync();
            }
        }

        // Sets up and returns a Chromium browser instance
        private async Task<IBrowser> SetupBrowserAsync()
        {
            // If a browser path is provided and exists, use it
            if (!string.IsNullOrEmpty(_browserExecutablePath) && File.Exists(_browserExecutablePath))
            {
                return await Puppeteer.LaunchAsync(new LaunchOptions
                {
                    Headless = true,   // Run without visible UI
                    ExecutablePath = _browserExecutablePath
                });
            }
            else
            {
                // Otherwise, download Chromium automatically
                Console.WriteLine("Downloading Chromium browser if needed");
                var browserFetcher = new BrowserFetcher();
                await browserFetcher.DownloadAsync();

                return await Puppeteer.LaunchAsync(new LaunchOptions
                {
                    Headless = true
                });
            }
        }
    }
}
This service handles the HTML to PDF conversion. It manages Chromium browser instances, converts HTML content to PDF, and lets you control paper size, margins, and orientation.
The service follows these steps:
- Browser Setup: Automatically downloads and manages Chromium instances.
- Page Creation: Creates a new browser page for rendering.
- Content Loading: Renders the HTML and waits for all resources to load.
- PDF Configuration: Sets paper size, orientation, margins, and other formatting options.
- PDF Generation: Creates the final PDF document and saves it to disk.
The service is reusable across different parts of your application, so you can generate PDFs from any HTML content without duplicating the browser setup logic.
Step 9: Implement the Main Program
Finally, update the Program.cs file to wire up the template and PDF services:
Click to view the main program implementation
using HtmlToPdfConverter.Models;
using PuppeteerSharp.Media;

namespace HtmlToPdfConverter
{
    class Program
    {
        static async Task Main(string[] args)
        {
            Console.WriteLine("Starting HTML to PDF conversion process with PuppeteerSharp");

            try
            {
                // Define the full path where you want outputs to go
                string outputDir = Path.Combine(
                    Environment.GetFolderPath(Environment.SpecialFolder.UserProfile),
                    "RiderProjects",
                    "HtmlToPdfConverter",
                    "HtmlToPdfConverter",
                    "Output"
                );

                Directory.CreateDirectory(outputDir);

                // 1. Initialize the template rendering service
                var templateService = new TemplateService();
                Console.WriteLine("Template service initialized");

                // 2. Initialize the PDF conversion service
                var pdfService = new PdfService();
                Console.WriteLine("PDF service initialized");

                // 3. Generate sample invoice data (in a real app, this would come from a database)
                var invoice = CreateSampleInvoice();
                Console.WriteLine($"Created sample invoice with number: {invoice.InvoiceNumber}");

                // 4. Render HTML from the Razor template with invoice data
                string templatePath = Path.Combine("Templates", "Invoice.cshtml");
                Console.WriteLine($"Rendering template: {templatePath}");
                string html = await templateService.RenderTemplateAsync(templatePath, invoice);

                // 5. Save the generated HTML for debugging (optional)
                string htmlOutputPath = Path.Combine(outputDir, $"Invoice_{invoice.InvoiceNumber}.html");
                await File.WriteAllTextAsync(htmlOutputPath, html);
                Console.WriteLine($"HTML output saved to: {htmlOutputPath}");

                // 6. Convert the HTML to PDF
                Console.WriteLine("Converting HTML to PDF");
                string pdfOutputPath = Path.Combine(outputDir, $"Invoice_{invoice.InvoiceNumber}.pdf");
                await pdfService.GeneratePdfFromHtmlAsync(html, pdfOutputPath, PaperFormat.A4);

                Console.WriteLine("PDF generation process completed successfully!");
                Console.WriteLine($"PDF saved to: {Path.GetFullPath(pdfOutputPath)}");
            }
            catch (Exception ex)
            {
                Console.ForegroundColor = ConsoleColor.Red;
                Console.WriteLine($"Error: {ex.Message}");
                Console.WriteLine(ex.StackTrace);
                Console.ResetColor();
            }
        }

        // Creates a sample invoice with test data for demonstration purposes
        static InvoiceModel CreateSampleInvoice()
        {
            // Generate an invoice number with year and random identifier
            Random random = new Random();
            string invoiceNumber = $"INV-{DateTime.Now:yyyy}-{random.Next(100, 999)}";

            return new InvoiceModel
            {
                InvoiceNumber = invoiceNumber,
                InvoiceDate = DateTime.Now,
                DueDate = DateTime.Now.AddDays(30),
                CompanyName = "PDFBolt",
                CompanyAddress = "123 Tech Street, Anytown, EX 12345",
                CompanyEmail = "[email protected]",
                CompanyPhone = "+1 (555) 123-4567",
                CompanyLogo = "https://img.pdfbolt.com/logo.png",
                ClientName = "Exampletron LLC",
                ClientAddress = "404 Infinite Loop, Nulltown, ZZ 00000",
                ClientEmail = "[email protected]",
                Currency = "$",
                TaxRate = 8.5m,
                Notes = "Payment is due within 30 days. Please include the invoice number with your payment.",
                Items = new List<InvoiceItem>
                {
                    new InvoiceItem
                    {
                        Description = "Null Handler Module",
                        Quantity = 1,
                        UnitPrice = 149.00m
                    },
                    new InvoiceItem
                    {
                        Description = "Loop Guard Service",
                        Quantity = 1,
                        UnitPrice = 89.00m
                    },
                    new InvoiceItem
                    {
                        Description = "Dark Mode Key",
                        Quantity = 1,
                        UnitPrice = 19.00m
                    },
                    new InvoiceItem
                    {
                        Description = "Stack Overflow Insurance",
                        Quantity = 3,
                        UnitPrice = 9.99m
                    }
                }
            };
        }
    }
}
Here's what the program does step by step:
- Service Initialization: Creates instances of both the template and PDF services.
- Data Preparation: Generates sample invoice data (in a real application, this would come from your database).
- Template Rendering: Processes the Razor template with the invoice data to produce HTML.
- HTML to PDF Conversion: Uses PuppeteerSharp to transform the HTML into a PDF document.
- Error Handling: Catches and reports errors at each step of the process.
Step 10: Run the Application
With all the components in place, you can now run the application to generate a PDF invoice:
dotnet run
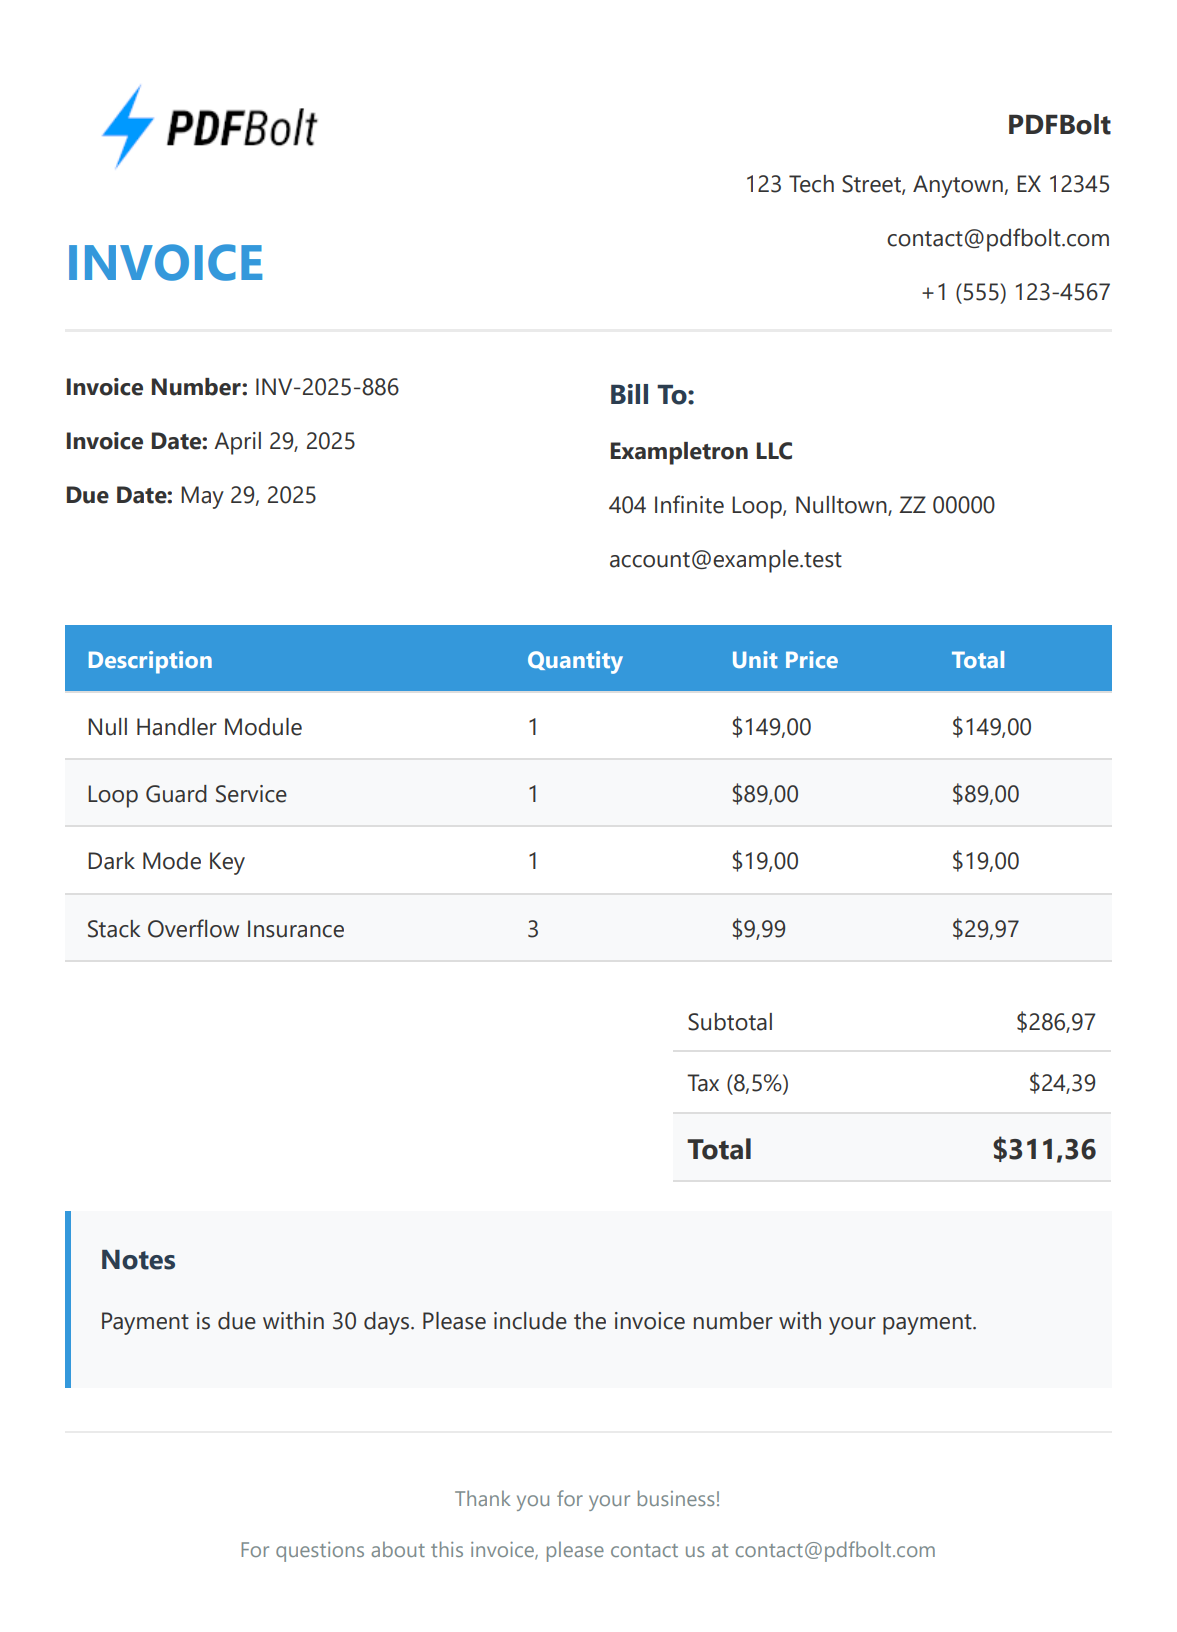
When you run this program, it will create two files in the Output directory:
- An HTML file containing the rendered template (optional but useful for debugging).
- The final PDF document with your invoice.
The console output logs each step of the process, so you can track progress and spot any issues.
If you open the generated PDF, you'll see a formatted invoice that looks like this:
PDF Formatting Options in PuppeteerSharp
PuppeteerSharp provides several configuration options for fine-tuning your PDF output.
Here are some of the most useful settings:
| Option | Description | Example Value |
|---|---|---|
| Format | Standard paper size | PaperFormat.A4 PaperFormat.Letter |
| Width/Height | Custom page dimensions | Width = "8.5in"Height = "11in" |
| Margins | Space around content | Top = "20px"Bottom = "20px" |
| PrintBackground | Include background colors/images | true false |
| Landscape | Page orientation | true (landscape) false (portrait) |
| Scale | Content scaling factor | 1.0 (100%)0.75 (75%) |
| DisplayHeaderFooter | Show custom header/footer | true false |
| HeaderTemplate | HTML for custom header | "<div>Page Header</div>" |
| FooterTemplate | HTML for custom footer | "<div>Page <span class='pageNumber'></span></div>" |
| PageRanges | Specific pages to include | "1-5, 8, 11-13" |
Here's an example of how to use these options in your code:
var pdfOptions = new PdfOptions
{
    Format = PaperFormat.A4,
    PrintBackground = true,
    MarginOptions = new MarginOptions
    {
        Top = "30px",
        Right = "30px",
        Bottom = "30px",
        Left = "30px"
    },
    DisplayHeaderFooter = true,
    HeaderTemplate = "<div style='width: 100%; text-align: center; font-size: 10px; font-family: Arial; padding: 5px;'>CONFIDENTIAL</div>",
    FooterTemplate = "<div style='width: 100%; text-align: center; font-size: 10px; font-family: Arial; padding: 5px;'>Page <span class='pageNumber'></span> of <span class='totalPages'></span></div>",
    Landscape = false
};
Optimize PuppeteerSharp Performance
When deploying PuppeteerSharp in production environments, consider these optimization techniques to improve throughput and reliability:
Browser Instance Pooling
Instead of creating and destroying browser instances for each PDF generation request, implement a browser pool that:
- Maintains a limited number of browser instances (typically 3-5).
- Reuses existing instances when available.
- Manages concurrent access with thread-safe mechanisms.
- Properly disposes resources when no longer needed.
This approach significantly reduces startup time and memory usage, especially for applications handling multiple concurrent PDF generation requests.
HTML and CSS Optimization
Trim your templates to improve rendering speed and output quality:
- Minimize external resources and dependencies.
- Use efficient CSS selectors and avoid complex layouts.
- Remove unnecessary JavaScript.
- Add print-specific CSS media queries (for page breaks, hiding non-essential elements).
- Ensure background colors and images print correctly with print-color-adjust properties.
For more detail on print-specific CSS techniques and page break controls, see Optimizing HTML for Professional PDF Output.
Asynchronous Processing
For high-volume PDF generation scenarios:
- Implement a queue system to manage incoming requests.
- Process PDF generation tasks in the background.
- Use a task-based approach with proper error handling.
- Set appropriate timeouts for long-running operations.
- Consider implementing a status tracking mechanism for client feedback.
These optimizations help your application handle PDF generation under load while keeping response times predictable.
Other C# Alternatives for PDF Generation
While PuppeteerSharp works well for HTML to PDF conversion in .NET and C# applications, you may want to consider these alternatives depending on your specific requirements. For a detailed comparison with benchmarks and code examples, see Top C# and .NET PDF Generation Libraries.
| Alternative | Key Features | Best For |
|---|---|---|
| DinkToPdf | Lightweight wrapper for wkhtmltopdf (requires wkhtmltopdf native binary). | Simple PDF generation with minimal .NET code. |
| Syncfusion PDF | Full-featured PDF processing library. | Applications needing PDF operations beyond conversion. |
| PDFsharp | Open-source .NET PDF library. | Low-level PDF creation and manipulation. |
| PDF Generation API | Cloud-based conversion services like PDFBolt. Supports both HTML and URL input. | High-volume PDF generation, serverless applications, and teams looking to minimize infrastructure management. |
Other .NET options include Playwright for C#, which offers cross-browser support and auto-wait capabilities, and iText 7, which provides precise layout control through its pdfHTML add-on.
API-Based Alternative: Template-Driven PDF Generation
While PuppeteerSharp gives you full control over PDF generation, the setup requires multiple services, browser management, and infrastructure overhead as demonstrated above. For teams that want to skip that setup, PDF generation APIs like PDFBolt offer a different approach.
- Design templates visually: Create invoice layouts in a template designer or choose from the template gallery.
- Eliminate infrastructure: No browser management, service setup, or Chromium dependencies.
- Centralize template logic: Handle styling and version control in one place.
- Simple integration: Just HTTP requests from your C# application.
Simple API call
using System;
using System.Net.Http;
using System.IO;
using System.Threading.Tasks;
using System.Text.Json;

public class PdfApiExample {
    public static async Task Main(string[] args) {
        using var client = new HttpClient();

        var requestData = new {
            templateId = "your-template-id",
            templateData = new {
                invoice_number = "INV-2025-886",
                invoice_date = "April 29, 2025",
                due_date = "May 29, 2025",
                company_name = "PDFBolt",
                company_address = "123 Tech Street, Anytown, EX 12345",
                company_email = "[email protected]",
                company_phone = "+1 (555) 123-4567",
                company_logo = "https://img.pdfbolt.com/logo.png",
                client_name = "Exampletron LLC",
                client_address = "404 Infinite Loop, Nulltown, ZZ 00000",
                client_email = "[email protected]",
                line_items = new object[] {
                    new {
                        description = "Null Handler Module",
                        quantity = 1,
                        unit_price = 149.00
                    },
                    new {
                        description = "Loop Guard Service",
                        quantity = 1,
                        unit_price = 89.00
                    }
                }
                // Add more invoice data
            }
        };

        var request = new HttpRequestMessage {
            Method = HttpMethod.Post,
            RequestUri = new Uri("https://api.pdfbolt.com/v1/direct"),
            Content = new StringContent(
                JsonSerializer.Serialize(requestData),
                System.Text.Encoding.UTF8,
                "application/json"
            )
        };

        request.Headers.Add("API-KEY", "XXXXXXXX-XXXX-XXXX-XXXX-XXXXXXXXXXXX");

        try {
            using var response = await client.SendAsync(request);

            if (!response.IsSuccessStatusCode) {
                var errorContent = await response.Content.ReadAsStringAsync();
                Console.WriteLine($"HTTP {(int)response.StatusCode}");
                Console.WriteLine($"Error Message: {errorContent}");
                return;
            }

            var pdfBytes = await response.Content.ReadAsByteArrayAsync();
            await File.WriteAllBytesAsync("invoice_pdfbolt.pdf", pdfBytes);
            Console.WriteLine("PDF generated successfully");
        } catch (Exception ex) {
            Console.WriteLine($"Error: {ex.Message}");
        }
    }
}
This approach works well for applications that need consistent document output without the overhead of managing browser automation infrastructure, or in containerized environments where installing Chromium dependencies can be challenging.
Conclusion
In this guide, you've seen how to convert HTML to PDF in C# using PuppeteerSharp – from environment setup to generating PDF invoices with Razor templates. You can now use this in your own C#/.NET applications for invoices, reports, or other automated document generation needs.
PuppeteerSharp gives you flexible, browser-based PDF generation from HTML, which fits well into .NET projects that need accurate document rendering. For teams that want to avoid browser dependency management, template-based PDF services provide an alternative that removes infrastructure overhead while maintaining output quality.
Evaluating PuppeteerSharp against a managed API? PDFBolt vs Puppeteer covers the trade-offs – same points apply since PuppeteerSharp is a .NET port.
Mission complete. No errors thrown, no elements clipped. Only good vibes and good PDFs. 🐛