Generate PDF Using PDF-lib in Node.js


If your Node.js app needs to generate or modify PDFs, pdf-lib is worth a look. It is one of several Node.js PDF libraries, each with different trade-offs. PDF‑lib is a pure JavaScript library for creating and modifying PDF documents. Unlike many alternatives, PDF-lib doesn't rely on native dependencies, making it lightweight and easy to integrate into any Node.js project. This guide covers PDF generation with PDF-lib in Node.js – from basic documents to invoices and forms.
How PDF-lib Works
PDF-lib manipulates PDF documents directly, without external dependencies.
Here's how it works:
-
Direct PDF Manipulation: PDF-lib works directly with the PDF format itself – it does not convert HTML to PDF. This is an important distinction, as PDF-lib is designed for programmatic creation and modification of PDF documents, not for rendering web content into PDFs.
-
PDF Document Model: PDF-lib creates an in-memory model of a PDF document that mirrors the actual PDF structure. This model includes pages, content streams, objects, and metadata.
-
Document Creation Flow: When you create a PDF with PDF-lib, you typically:
- Create a document object –
PDFDocument. - Add pages to the document.
- Embed fonts and other resources (images, etc.).
- Draw content (text, shapes, images) on pages.
- Save the document to bytes which can be written to a file.
- Create a document object –
-
Content Coordinates: PDF-lib uses a coordinate system where (0,0) is at the bottom-left corner of the page, with positive x-axis extending to the right and positive y-axis extending upward.
-
Asynchronous Operations: Many PDF-lib operations return Promises, so you can load large files without blocking.
Why Choose PDF-lib?
Why pick PDF-lib over other options?
- Pure JavaScript: No native dependencies or binaries required – unlike browser-based tools like Puppeteer that need Chromium.
- TypeScript compatibility: Includes TypeScript type definitions.
- Small footprint: Lightweight compared to alternatives like PDFKit or PDFMake.
- Stable and widely adopted: Millions of weekly npm downloads and a large user base.
- Wide API coverage: Supports text, images, forms, metadata, and PDF modification.
Installing PDF-lib in Node.js
Start by adding PDF-lib to your Node.js project:
npm install pdf-lib
For TypeScript users, the types are included, so no additional packages are needed.
Basic PDF Generation with PDF-lib
Creating a Simple PDF Document
Here's a basic example showing how to create a PDF with text:
const { PDFDocument, rgb, StandardFonts } = require('pdf-lib');
const fs = require('fs').promises;

async function createPdf() {
    // Create a new empty PDF document
    const pdfDoc = await PDFDocument.create();

    // Add a new page to the document with default A4 size
    const page = pdfDoc.addPage();

    // Embed Helvetica font (built-in standard font)
    const helveticaFont = await pdfDoc.embedFont(StandardFonts.Helvetica);

    // Get page dimensions for positioning
    const { width, height } = page.getSize();
    const fontSize = 30;

    // Place text on the page with specific coordinates
    page.drawText('Hello!', {
        x: 50,                  // Horizontal position from left edge
        y: height - 100,        // Vertical position from bottom edge
        size: fontSize,
        font: helveticaFont,
        color: rgb(0, 0, 0),
    });

    page.drawText('Hope you have an awesome day!', {
        x: 50,
        y: height - 180,
        size: fontSize,
        font: helveticaFont,
        color: rgb(0, 0, 1),
    });

    // Convert document to file and save
    const pdfBytes = await pdfDoc.save();
    await fs.writeFile('output.pdf', pdfBytes);

    console.log('PDF created successfully! (output.pdf)');
}

// Handle any potential errors
createPdf().catch(err => {
    console.error('Error creating PDF:', err);
});
This basic script creates a PDF with a single page and adds text to it:

Adding Images to Your PDF
You can also embed images in your PDF documents:
const { PDFDocument } = require('pdf-lib');
const fs = require('fs').promises;

async function createPdfWithImage() {
    // Create a new empty PDF document
    const pdfDoc = await PDFDocument.create();

    // Add a new page to the document
    const page = pdfDoc.addPage();

    // Read local image file
    const imageData = await fs.readFile('image.jpg');

    // Embed image into the PDF
    const embeddedImage = await pdfDoc.embedJpg(imageData);

    // Scale image to fit the page
    const imageDimensions = embeddedImage.scale(0.4);

    // Get page dimensions for positioning
    const { width, height } = page.getSize();

    // Draw image centered horizontally
    page.drawImage(embeddedImage, {
        x: (width - imageDimensions.width) / 2,
        y: height - imageDimensions.height - 50,
        width: imageDimensions.width,
        height: imageDimensions.height,
    });

    // Convert document to file and save
    const pdfBytes = await pdfDoc.save();
    await fs.writeFile('output-with-image.pdf', pdfBytes);

    console.log('PDF with image created successfully!');
}

// Handle any potential errors
createPdfWithImage().catch(err => {
    console.error('Error creating PDF with image:', err);
});
- For PNG images – use
pdfDoc.embedPng(). - For JPEG – use
embedJpg().

Modifying Existing PDFs with PDF-lib
One of PDF-lib's strengths is its ability to modify existing PDF documents.
Adding a New Page
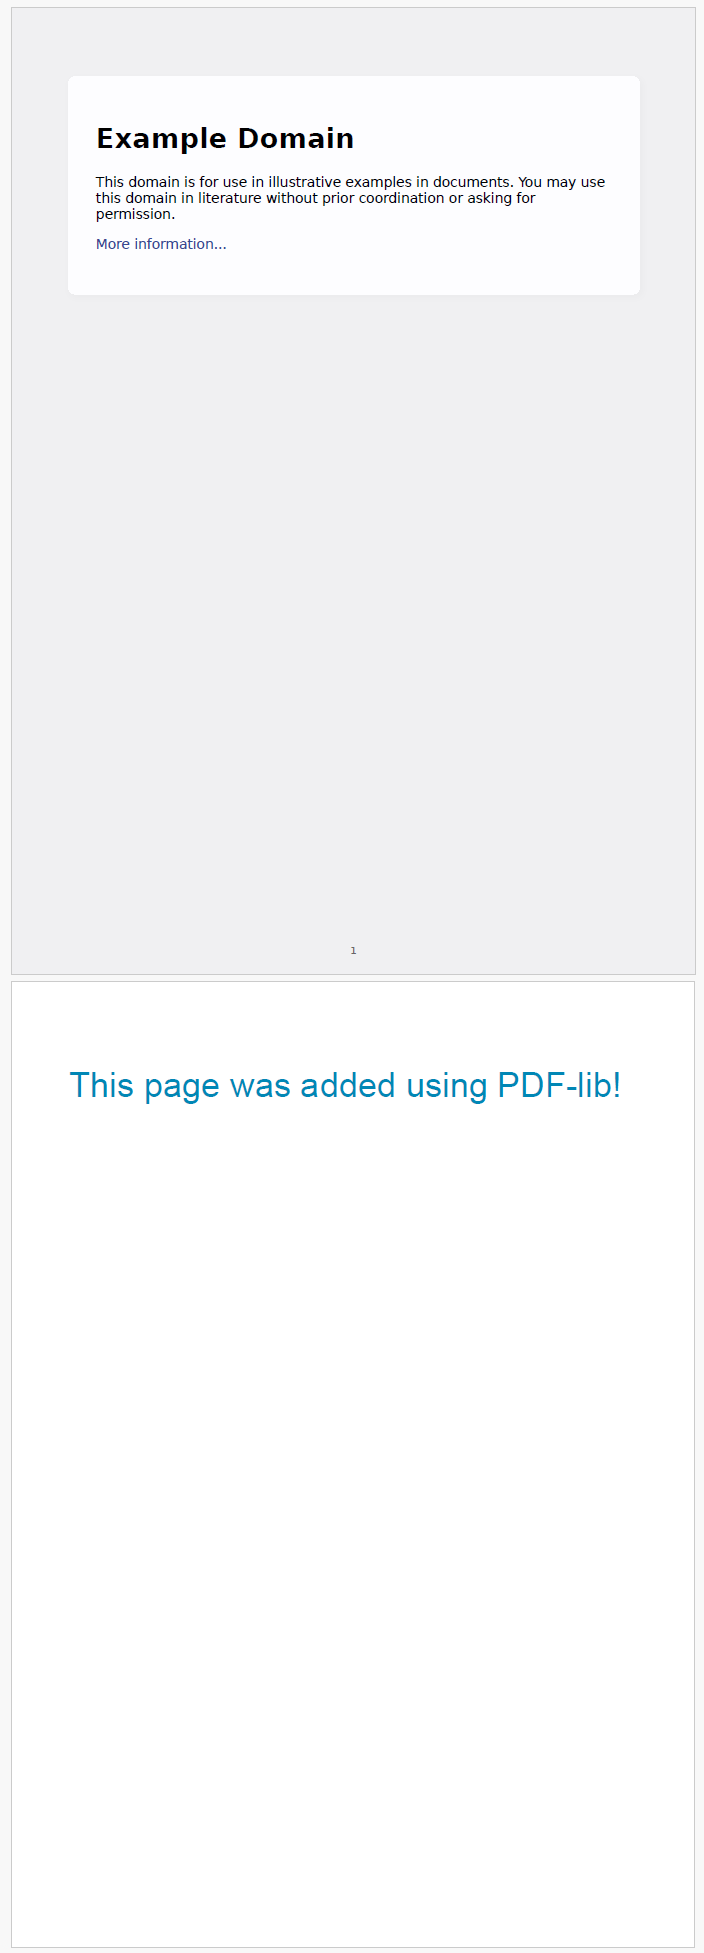
In the example below, we load an existing PDF, add a new page to it, and place example text:
const { PDFDocument, StandardFonts, rgb } = require('pdf-lib');
const fs = require('fs').promises;

async function modifyPdf() {
    // Load existing PDF
    const existingPdfData = await fs.readFile('example.pdf');
    const pdfDoc = await PDFDocument.load(existingPdfData);

    // Add a new page
    const page = pdfDoc.addPage();

    // Embed the standard Helvetica font
    const helveticaFont = await pdfDoc.embedFont(StandardFonts.Helvetica);

    // Get page dimensions
    const { width, height } = page.getSize();

    // Draw text on the new page
    page.drawText('This page was added using PDF-lib!', {
        x: 50,
        y: height - 100,
        size: 30,
        font: helveticaFont,
        color: rgb(0, 0.53, 0.71),
    });

    // Save the modified PDF
    const modifiedPdfBytes = await pdfDoc.save();
    await fs.writeFile('modified.pdf', modifiedPdfBytes);

    console.log('PDF modified successfully!');
}

// Handle any potential errors
modifyPdf().catch(err => {
    console.error('Error modifying PDF:', err);
});
Here is an example output:
Adding a Watermark to Each Page
In this next example, we load an existing PDF and add a watermark to each page:
const { PDFDocument, StandardFonts, rgb, degrees } = require('pdf-lib');
const fs = require('fs').promises;

async function addWatermark() {
    // Load existing PDF
    const existingPdfData = await fs.readFile('file-sample.pdf');
    const pdfDoc = await PDFDocument.load(existingPdfData);

    // Embed the standard Helvetica font
    const helveticaFont = await pdfDoc.embedFont(StandardFonts.Helvetica);

    // Get all pages in the document
    const pages = pdfDoc.getPages();

    // Add watermark to each page
    pages.forEach(page => {
        const { width, height } = page.getSize();

        const watermarkText = 'CONFIDENTIAL';
        const fontSize = 75;

        page.drawText(watermarkText, {
            x: width / 2 - 180,
            y: height / 2 - 200,
            size: fontSize,
            font: helveticaFont,
            color: rgb(0.9, 0.1, 0.1),
            opacity: 0.2,
            rotate: degrees(45),
        });
    });

    // Save the modified PDF
    const modifiedPdfBytes = await pdfDoc.save();
    await fs.writeFile('watermarked.pdf', modifiedPdfBytes);

    console.log('PDF watermarked successfully!');
}

// Handle any potential errors
addWatermark().catch(err => {
    console.error('Error adding watermark:', err);
});
Example output:

Merging Multiple PDFs
Combining multiple PDF documents into one:
const { PDFDocument } = require('pdf-lib');
const fs = require('fs').promises;

async function mergePdfs() {
    try {
        // Create a new PDF document
        const mergedPdf = await PDFDocument.create();

        // Load the first PDF
        const pdf1Bytes = await fs.readFile('document1.pdf');
        const pdf1 = await PDFDocument.load(pdf1Bytes);

        // Load the second PDF
        const pdf2Bytes = await fs.readFile('document2.pdf');
        const pdf2 = await PDFDocument.load(pdf2Bytes);

        // Copy pages from the first document
        const pdf1Pages = await mergedPdf.copyPages(pdf1, pdf1.getPageIndices());
        for (const page of pdf1Pages) {
            mergedPdf.addPage(page);
        }

        // Copy pages from the second document
        const pdf2Pages = await mergedPdf.copyPages(pdf2, pdf2.getPageIndices());
        for (const page of pdf2Pages) {
            mergedPdf.addPage(page);
        }

        // Save the merged PDF
        const mergedPdfBytes = await mergedPdf.save();
        await fs.writeFile('merged.pdf', mergedPdfBytes);

        console.log('PDFs merged successfully!');
    } catch (err) {
        console.error('Error merging PDFs:', err);
        if (err.code === 'ENOENT') {
            console.error('One of the PDF files does not exist');
        }
    }
}

mergePdfs();
Creating PDF Forms with PDF-lib
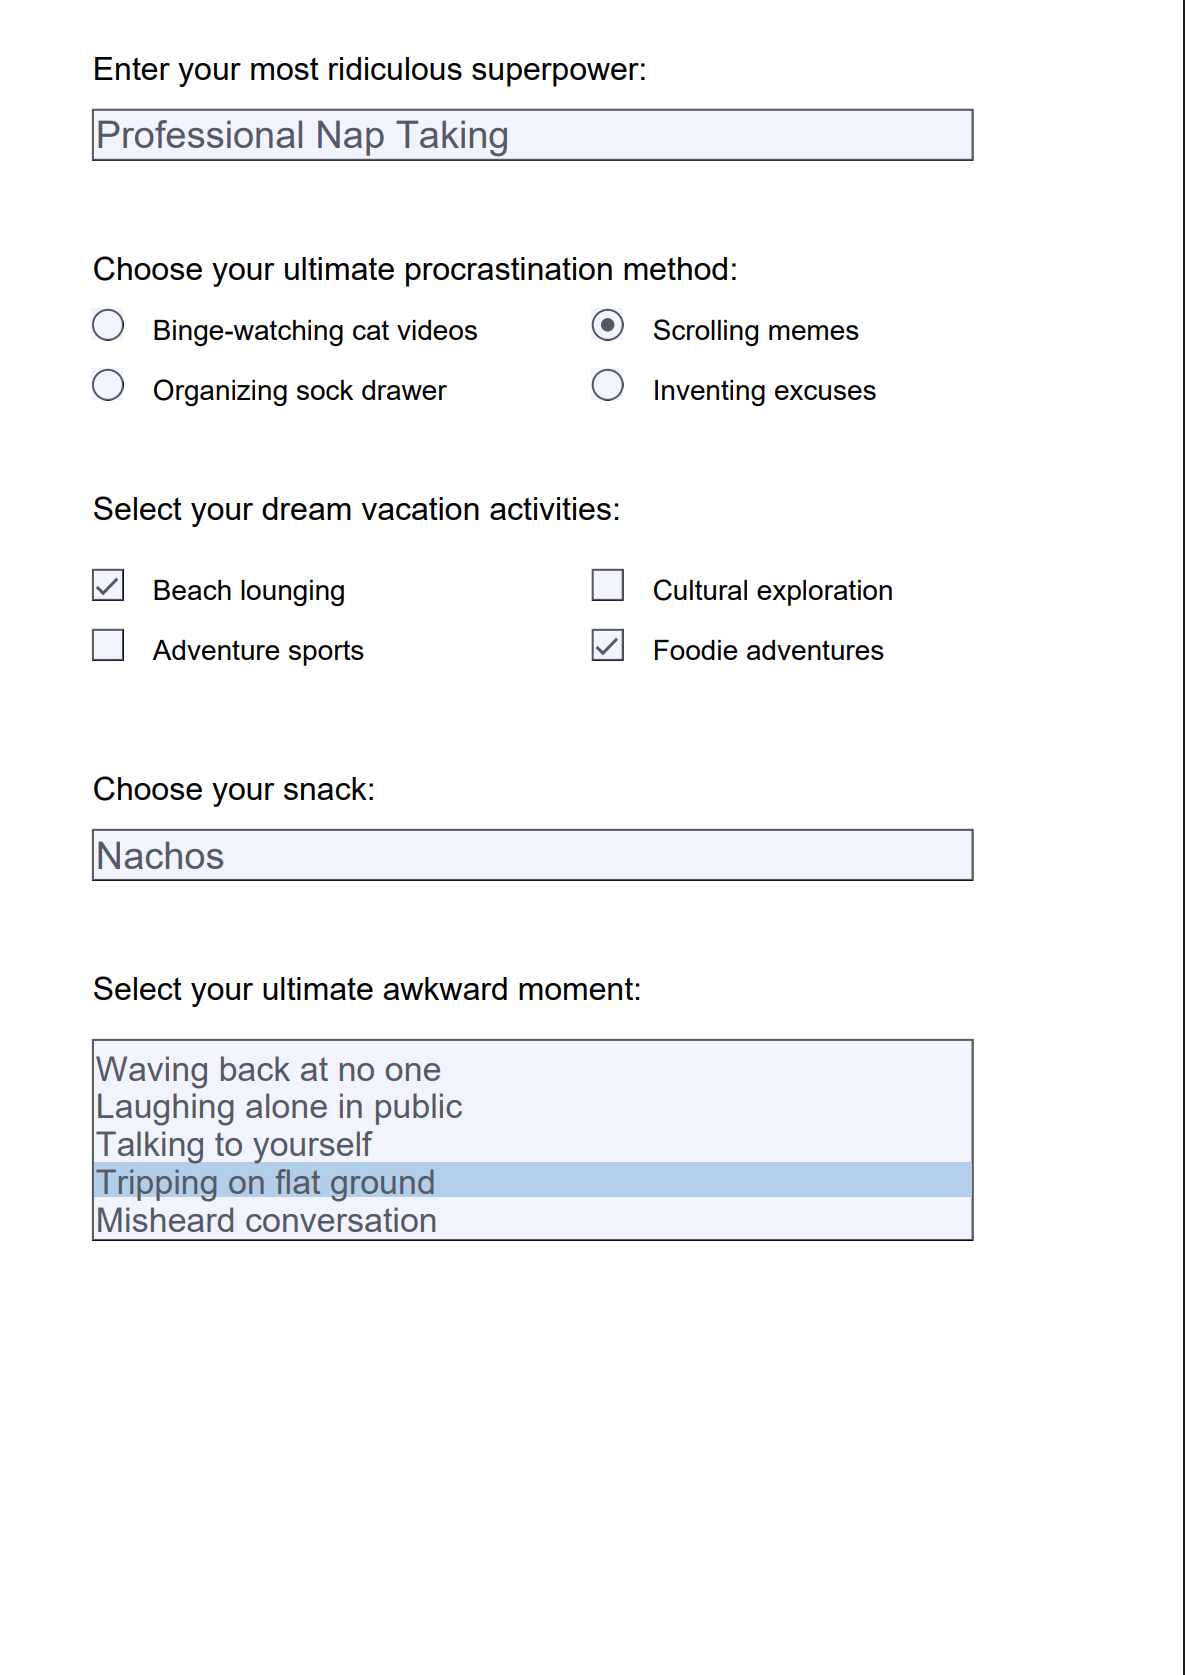
PDF-lib lets you create interactive forms in PDF documents, such as text inputs, radio buttons, checkboxes, dropdowns, and option lists.
Below is an example of how to create such a form:
Click to view the example
const { PDFDocument } = require('pdf-lib');
const fs = require('fs').promises;

async function createForm() {
    // Create a new PDF document
    const pdfDoc = await PDFDocument.create();

    // Add a new page with specified dimensions
    const page = pdfDoc.addPage();

    // Create a form for the document
    const form = pdfDoc.getForm();

    // Add text input field
    page.drawText('Enter your most ridiculous superpower:', { x: 50, y: 800, size: 16 });
    const superpowerInput = form.createTextField('superpower.input');
    superpowerInput.setText('Professional Nap Taking');
    superpowerInput.addToPage(page, { x: 50, y: 760, width: 440, height: 25 });

    // Add radio button group
    page.drawText('Choose your ultimate procrastination method:', { x: 50, y: 700, size: 16 });
    page.drawText('Binge-watching cat videos', { x: 80, y: 670, size: 14 });
    page.drawText('Organizing sock drawer', { x: 80, y: 640, size: 14 });
    page.drawText('Scrolling memes', { x: 330, y: 670, size: 14 });
    page.drawText('Inventing excuses', { x: 330, y: 640, size: 14 });

    const procrastinationGroup = form.createRadioGroup('procrastination.method');
    procrastinationGroup.addOptionToPage('Binge-watching cat videos', page, { x: 50, y: 670, width: 15, height: 15 });
    procrastinationGroup.addOptionToPage('Organizing sock drawer', page, { x: 50, y: 640, width: 15, height: 15 });
    procrastinationGroup.addOptionToPage('Scrolling memes', page, { x: 300, y: 670, width: 15, height: 15 });
    procrastinationGroup.addOptionToPage('Inventing excuses', page, { x: 300, y: 640, width: 15, height: 15 });
    procrastinationGroup.select('Scrolling memes');

    // Add checkboxes
    page.drawText('Select your dream vacation activities:', { x: 50, y: 580, size: 16 });
    page.drawText('Beach lounging', { x: 80, y: 540, size: 14 });
    page.drawText('Adventure sports', { x: 80, y: 510, size: 14 });
    page.drawText('Cultural exploration', { x: 330, y: 540, size: 14 });
    page.drawText('Foodie adventures', { x: 330, y: 510, size: 14 });

    const firstActivityBox = form.createCheckBox('vacation.activity1');
    const secondActivityBox = form.createCheckBox('vacation.activity2');
    const thirdActivityBox = form.createCheckBox('vacation.activity3');
    const fourthActivityBox = form.createCheckBox('vacation.activity4');

    firstActivityBox.addToPage(page, { x: 50, y: 540, width: 15, height: 15 });
    secondActivityBox.addToPage(page, { x: 50, y: 510, width: 15, height: 15 });
    thirdActivityBox.addToPage(page, { x: 300, y: 540, width: 15, height: 15 });
    fourthActivityBox.addToPage(page, { x: 300, y: 510, width: 15, height: 15 });

    // Pre-check some activities
    firstActivityBox.check();
    fourthActivityBox.check();

    // Add dropdown for snack selection
    page.drawText('Choose your snack:', { x: 50, y: 440, size: 16 });
    const snackDropdown = form.createDropdown('snack.selection');
    snackDropdown.addOptions(['Pizza', 'Chocolate', 'Nachos', 'Ice Cream']);
    snackDropdown.select('Nachos');
    snackDropdown.addToPage(page, { x: 50, y: 400, width: 440, height: 25 });

    // Add option list
    page.drawText('Select your ultimate awkward moment:', { x: 50, y: 340, size: 16 });
    const awkwardMomentList = form.createOptionList('awkward.moment');
    awkwardMomentList.addOptions([
        'Waving back at no one',
        'Laughing alone in public',
        'Talking to yourself',
        'Tripping on flat ground',
        'Misheard conversation'
    ]);
    awkwardMomentList.select('Tripping on flat ground');
    awkwardMomentList.addToPage(page, { x: 50, y: 220, width: 440, height: 100 });

    // Save the PDF document
    const pdfBytes = await pdfDoc.save();
    await fs.writeFile('form.pdf', pdfBytes);
    console.log('Hilarious form created successfully!');
}

// Run the function and handle any errors
createForm().catch(console.error);
Here is the preview of output:
Adding Metadata to Your PDF
Metadata like title, author, and keywords makes your PDFs easier to find and organize.
Here's how to add metadata to a PDF:
const { PDFDocument, rgb, StandardFonts } = require('pdf-lib');
const fs = require('fs').promises;

async function createPdf() {
    // Create a new PDF document
    const pdfDoc = await PDFDocument.create();

    // Add a new page
    const page = pdfDoc.addPage();

    // Embed Helvetica font
    const helveticaFont = await pdfDoc.embedFont(StandardFonts.Helvetica);

    // Place some text on the page
    page.drawText('This document includes metadata information.', {
        x: 50,
        y: 750,
        size: 24,
        font: helveticaFont,
        color: rgb(0, 0.5, 0),
    });

    // Set document metadata
    pdfDoc.setTitle('The Coding Adventure');
    pdfDoc.setAuthor('Curious Developer');
    pdfDoc.setSubject('Exploring PDF Generation');
    pdfDoc.setKeywords(['pdf-lib', 'nodejs', 'metadata']);
    pdfDoc.setCreator('Code Craft Workshop');
    pdfDoc.setProducer('Learning Project');

    // Save the PDF
    const pdfBytes = await pdfDoc.save();
    await fs.writeFile('metadata.pdf', pdfBytes);

    console.log('PDF with metadata created successfully!');
}

// Handle any potential errors
createPdf().catch(err => {
    console.error('Error creating PDF:', err);
});
Drawing Shapes and Lines in PDF-lib
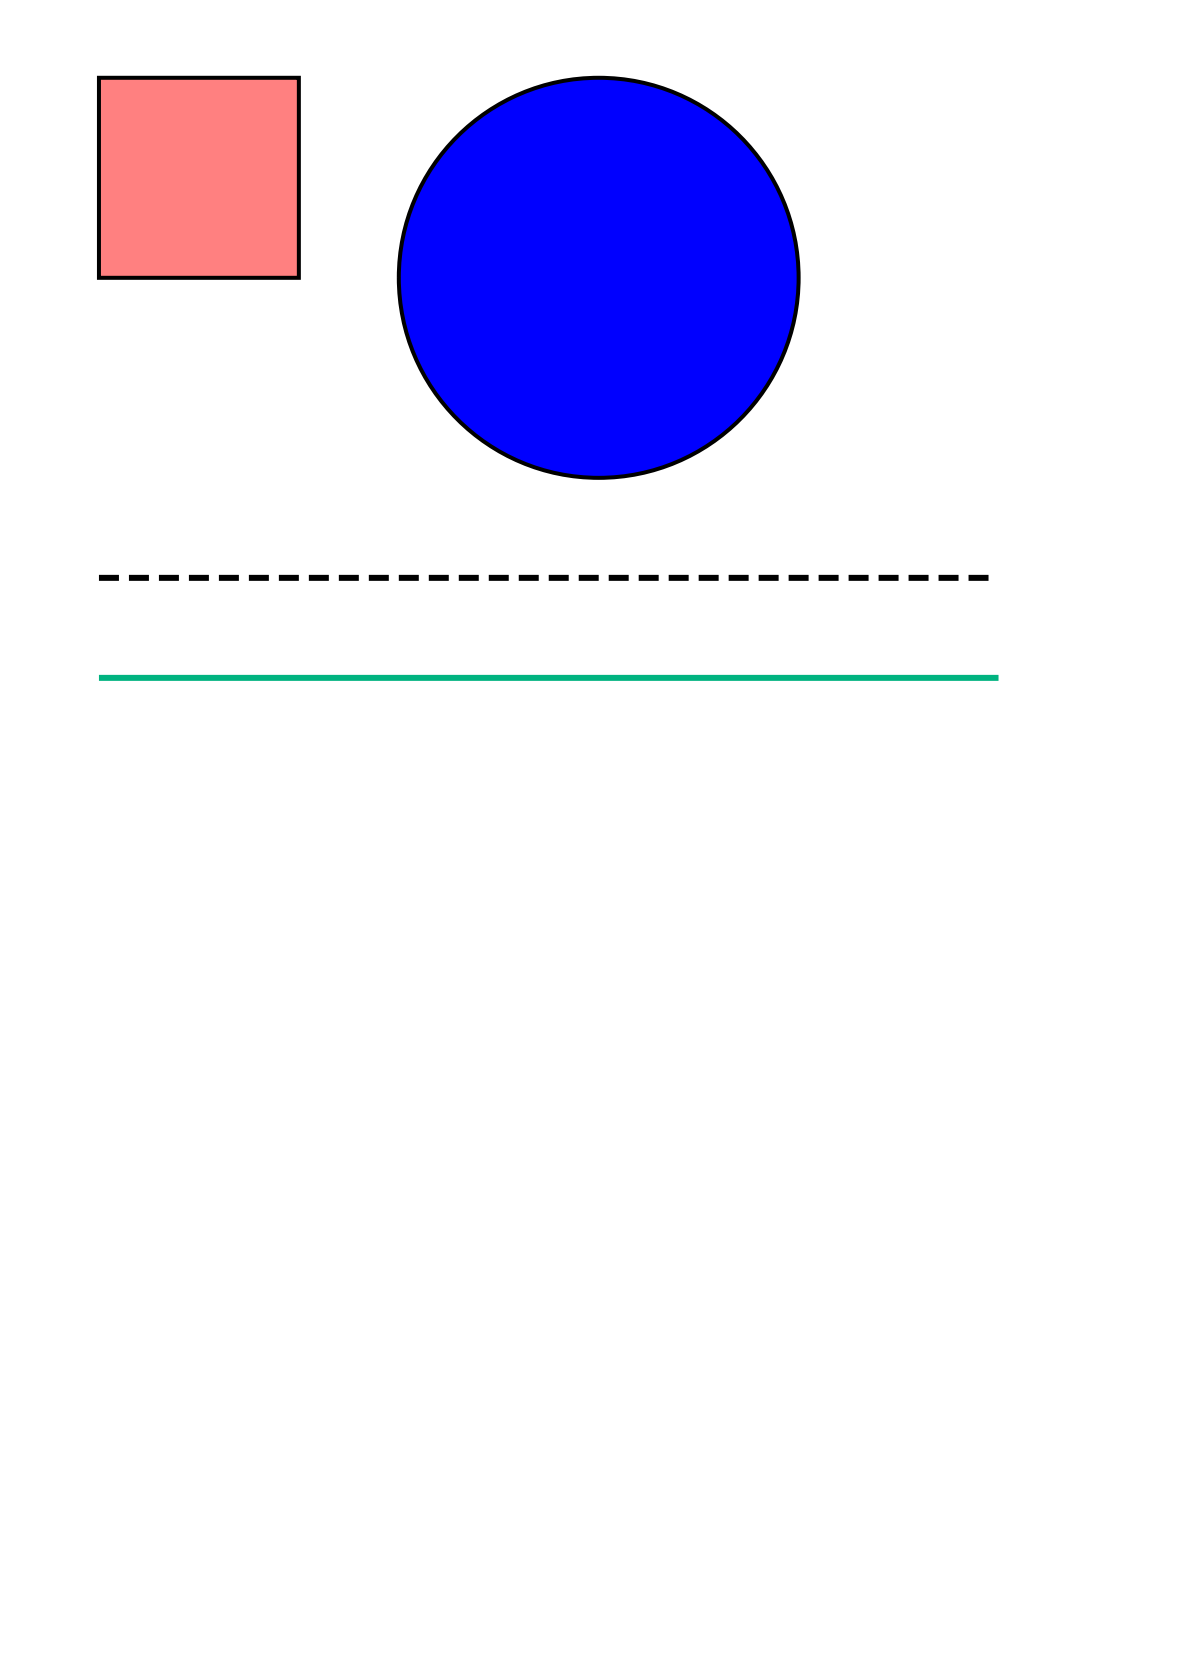
You can also draw shapes with PDF-lib:
const { PDFDocument, rgb, StandardFonts } = require('pdf-lib');
const fs = require('fs').promises;

async function createPdfWithShapes() {
    // Create a new PDF document
    const pdfDoc = await PDFDocument.create();

    // Add a blank page
    const page = pdfDoc.addPage();

    // Draw a rectangle
    page.drawRectangle({
        x: 50,
        y: 700,
        width: 100,
        height: 100,
        color: rgb(1, 0, 0), // Red fill
        borderColor: rgb(0, 0, 0), // Black border
        borderWidth: 2,
        opacity: 0.5, // Semi-transparent
    });

    // Draw a circle
    const centerX = 300;
    const centerY = 700;
    const radius = 50;

    page.drawCircle({
        x: centerX,
        y: centerY,
        size: radius,
        color: rgb(0, 0, 1), // Blue fill
        borderColor: rgb(0, 0, 0), // Black border
        borderWidth: 2,
    });

    // Draw lines
    page.drawLine({
        start: { x: 50, y: 550 },
        end: { x: 500, y: 550 },
        thickness: 3,
        color: rgb(0, 0, 0),
        dashArray: [10, 5], // Dashed line
    });

    // Draw a solid line
    page.drawLine({
        start: { x: 50, y: 500 },
        end: { x: 500, y: 500 },
        thickness: 3,
        color: rgb(0, 0.7, 0.5)
    });

    // Save the PDF
    const pdfBytes = await pdfDoc.save();
    await fs.writeFile('shapes.pdf', pdfBytes);

    console.log('PDF with shapes created successfully!');
}

// Handle any potential errors
createPdfWithShapes().catch(err => {
    console.error('Error creating PDF:', err);
});
Here is the output:
Handling Text Wrapping in PDF-lib
PDF-lib's drawText method accepts a maxWidth parameter that wraps text within a given width. This example shows how to use it:
const { PDFDocument, StandardFonts, rgb } = require('pdf-lib');
const fs = require('fs').promises;

async function createPdfWithWrappedText() {
    try {
        // Create a new PDF document
        const pdfDoc = await PDFDocument.create();

        // Add a new page
        const page = pdfDoc.addPage();

        // Get page dimensions
        const { width, height } = page.getSize();

        // Embed a standard font
        const font = await pdfDoc.embedFont(StandardFonts.TimesRoman);

        // Sample text to be wrapped
        const text = 'This is a long paragraph that will be automatically wrapped to ' +
            'fit within the specified width. PDF-lib provides options for controlling ' +
            'the line height and text alignment. This makes it easier to create ' +
            'documents with well-formatted text that remains readable.';

        // Draw text
        page.drawText(text, {
            x: 50,
            y: height - 50,
            size: 14,
            font: font,
            color: rgb(0, 0, 0),
            maxWidth: width - 100,
            lineHeight: 16
        });

        // Save the PDF
        const pdfBytes = await pdfDoc.save();
        await fs.writeFile('wrapped-text.pdf', pdfBytes);

        console.log('PDF with wrapped text created successfully!');
    } catch (err) {
        console.error('Error creating PDF with wrapped text:', err);
    }
}

createPdfWithWrappedText();
Here is the output:

For more advanced layout use cases, explore the official PDF-lib documentation. If you need automatic pagination with rich text layout, PDFMake offers a declarative approach, or you can use HTML and CSS for layout via an API.
Real-World Example: Creating a Professional Invoice
Here's a more complete example: building an invoice PDF. It combines text, images, a table, and styled layout.
Click to view complete code
const {PDFDocument, rgb, StandardFonts, degrees} = require('pdf-lib');
const fs = require('fs').promises;

// Invoice data
const invoiceData = {
    // Company information
    company: {
        name: 'AWESOME COMPANY',
        details: [
            'Awesome Company Inc.',
            '123 Business Avenue, Suite 100',
            'San Francisco, CA 94107',
            '[email protected]',
            '+1 (555) 123-4567'
        ],
        logo: 'logo.png', // Path to company logo
        website: 'www.awesomecompany.com'
    },

    // Invoice details
    invoice: {
        number: 'INV-2025-0427',
        date: 'April 27, 2025',
        dueDate: 'May 27, 2025',
        paymentTerms: 'Net 30'
    },

    // Client information
    client: {
        name: 'Client Company LLC',
        details: [
            'Client Company LLC',
            'Attn: John Smith',
            '456 Client Street',
            'New York, NY 10001',
            '[email protected]'
        ]
    },

    // Invoice items
    items: [
        {id: 1, description: 'Website Development Services', quantity: 1, amount: 3500.00},
        {id: 2, description: 'UI/UX Design', quantity: 1, amount: 1200.00},
        {id: 3, description: 'Content Creation', quantity: 10, amount: 800.00},
        {id: 4, description: 'Hosting Setup (Annual)', quantity: 1, amount: 240.00}
    ],

    // Tax rate
    taxRate: 0.08, // 8%

    // Payment information
    paymentInfo: [
        'Bank: International Bank of Example',
        'Account Name: Awesome Company Inc.',
        'Account Number: 1234567890',
        'Payment Terms: Net 30'
    ],

    // Notes
    notes: 'Thank you for your business! Please make payment by the due date.'
};

// Define colors
const colors = {
    primary: rgb(0.3, 0.4, 0.6),
    lightGray: rgb(0.95, 0.95, 0.95),
    gray: rgb(0.8, 0.8, 0.8),
    textColor: rgb(0.1, 0.1, 0.1),
    white: rgb(1, 1, 1)
};

// Font sizes
const fontSizes = {
    title: 24,
    heading: 14,
    normal: 12,
    small: 10
};

async function createInvoice() {
    // Create a new PDF document
    const pdfDoc = await PDFDocument.create();

    // Add a page
    const page = pdfDoc.addPage();

    // Embed fonts
    const fonts = {
        bold: await pdfDoc.embedFont(StandardFonts.HelveticaBold),
        regular: await pdfDoc.embedFont(StandardFonts.Helvetica),
        oblique: await pdfDoc.embedFont(StandardFonts.HelveticaOblique)
    };

    // Get page dimensions for positioning
    const {width, height} = page.getSize();

    // Define margins and spacing
    const layout = {
        leftMargin: 40,
        rightMargin: width - 40,
        topMargin: height - 140,
        headerHeight: 140,
        detailLineHeight: 15,
        rowHeight: 20,
        footerHeight: 40
    };

    // Draw header background
    page.drawRectangle({
        x: 0,
        y: layout.topMargin,
        width: width,
        height: layout.headerHeight,
        color: colors.primary
    });

    // Draw company name
    page.drawText(invoiceData.company.name, {
        x: layout.leftMargin,
        y: height - 50,
        size: fontSizes.title,
        font: fonts.bold,
        color: colors.white
    });

    // Load and embed the logo
    try {
        const logoBytes = await fs.readFile(invoiceData.company.logo);
        const logoImage = await pdfDoc.embedPng(logoBytes);
        const logoDims = logoImage.scale(0.04); // Scale down the logo if needed

        page.drawImage(logoImage, {
            x: layout.leftMargin * 3,
            y: height - 135,
            width: logoDims.width,
            height: logoDims.height
        });
    } catch (error) {
        console.error('Error loading logo:', error);
    }

    // Draw Invoice text on the right side
    const invoiceTextX = width - 230;
    page.drawText('INVOICE', {
        x: invoiceTextX,
        y: height - 50,
        size: fontSizes.title,
        font: fonts.bold,
        color: colors.white
    });

    // Invoice details on the right
    let invoiceDetailY = height - 80;

    page.drawText(`Invoice No: ${invoiceData.invoice.number}`, {
        x: invoiceTextX,
        y: invoiceDetailY,
        size: fontSizes.normal,
        font: fonts.regular,
        color: colors.white
    });

    invoiceDetailY -= layout.detailLineHeight;
    page.drawText(`Date: ${invoiceData.invoice.date}`, {
        x: invoiceTextX,
        y: invoiceDetailY,
        size: fontSizes.normal,
        font: fonts.regular,
        color: colors.white
    });

    invoiceDetailY -= layout.detailLineHeight;
    page.drawText(`Due Date: ${invoiceData.invoice.dueDate}`, {
        x: invoiceTextX,
        y: invoiceDetailY,
        size: fontSizes.normal,
        font: fonts.regular,
        color: colors.white
    });

    // Set up billing sections
    const billingY = height - 200;

    // Bill To section
    page.drawText('BILL TO:', {
        x: layout.leftMargin,
        y: billingY,
        size: fontSizes.heading,
        font: fonts.bold,
        color: colors.textColor
    });

    let clientY = billingY - 20;
    invoiceData.client.details.forEach((line) => {
        page.drawText(line, {
            x: layout.leftMargin,
            y: clientY,
            size: fontSizes.normal,
            font: fonts.regular,
            color: colors.textColor
        });
        clientY -= layout.detailLineHeight;
    });

    // Bill From section
    const billFromX = width - 230;
    page.drawText('BILL FROM:', {
        x: billFromX,
        y: billingY,
        size: fontSizes.heading,
        font: fonts.bold,
        color: colors.textColor
    });

    let companyY = billingY - 20;
    invoiceData.company.details.forEach((line) => {
        page.drawText(line, {
            x: billFromX,
            y: companyY,
            size: fontSizes.normal,
            font: fonts.regular,
            color: colors.textColor
        });
        companyY -= layout.detailLineHeight;
    });

    // Service/Product table
    const tableTop = billingY - 140;
    const tableWidth = width - 80;
    const colWidths = [40, 280, 100, 100]; // ID, Description, Quantity, Amount

    // Table header row
    page.drawRectangle({
        x: layout.leftMargin,
        y: tableTop - layout.rowHeight,
        width: tableWidth,
        height: layout.rowHeight,
        color: colors.lightGray
    });

    const headers = ['#', 'Description', 'Quantity', 'Amount'];
    let xOffset = layout.leftMargin;

    headers.forEach((header, i) => {
        page.drawText(header, {
            x: xOffset + 5,
            y: tableTop - 15,
            size: fontSizes.normal,
            font: fonts.bold,
            color: colors.textColor
        });
        xOffset += colWidths[i];
    });

    // Table rows
    let rowY = tableTop - 40;

    invoiceData.items.forEach((item, rowIndex) => {
        // Alternating row colors
        if (rowIndex % 2 === 1) {
            page.drawRectangle({
                x: layout.leftMargin,
                y: rowY - 5,
                width: tableWidth,
                height: layout.rowHeight,
                color: colors.lightGray
            });
        }

        let rowX = layout.leftMargin;

        // Item ID
        page.drawText(item.id.toString(), {
            x: rowX + 5,
            y: rowY,
            size: fontSizes.normal,
            font: fonts.regular,
            color: colors.textColor
        });
        rowX += colWidths[0];

        // Description
        page.drawText(item.description, {
            x: rowX + 5,
            y: rowY,
            size: fontSizes.normal,
            font: fonts.regular,
            color: colors.textColor
        });
        rowX += colWidths[1];

        // Quantity (right-aligned)
        page.drawText(item.quantity.toString(), {
            x: rowX + colWidths[2] - 60,
            y: rowY,
            size: fontSizes.normal,
            font: fonts.regular,
            color: colors.textColor
        });
        rowX += colWidths[2];

        // Amount (right-aligned with currency formatting)
        page.drawText(`${item.amount.toFixed(2)}`, {
            x: rowX + colWidths[3] - 60,
            y: rowY,
            size: fontSizes.normal,
            font: fonts.regular,
            color: colors.textColor
        });

        rowY -= layout.rowHeight;
    });

    // Calculate totals
    const subtotal = invoiceData.items.reduce((sum, item) => sum + item.amount, 0);
    const tax = subtotal * invoiceData.taxRate;
    const total = subtotal + tax;

    // Summary section with totals
    const summaryX = 350;
    const amountX = width - 100;
    rowY -= 10;

    page.drawText('Subtotal:', {
        x: summaryX,
        y: rowY,
        size: fontSizes.normal,
        font: fonts.regular,
        color: colors.textColor
    });

    page.drawText(`${subtotal.toFixed(2)}`, {
        x: amountX,
        y: rowY,
        size: fontSizes.normal,
        font: fonts.regular,
        color: colors.textColor
    });

    rowY -= layout.rowHeight;

    page.drawText(`Tax (${(invoiceData.taxRate * 100).toFixed(0)}%):`, {
        x: summaryX,
        y: rowY,
        size: fontSizes.normal,
        font: fonts.regular,
        color: colors.textColor
    });

    page.drawText(`${tax.toFixed(2)}`, {
        x: amountX,
        y: rowY,
        size: fontSizes.normal,
        font: fonts.regular,
        color: colors.textColor
    });

    // Draw line above totals
    page.drawLine({
        start: {x: 330, y: rowY - 10},
        end: {x: layout.rightMargin, y: rowY - 10},
        thickness: 1,
        color: colors.gray
    });

    rowY -= 30;

    page.drawText('Total:', {
        x: summaryX,
        y: rowY,
        size: fontSizes.normal,
        font: fonts.bold,
        color: colors.textColor
    });

    page.drawText(`${total.toFixed(2)}`, {
        x: amountX,
        y: rowY,
        size: fontSizes.normal,
        font: fonts.bold,
        color: colors.textColor
    });

    // Draw line
    page.drawLine({
        start: {x: layout.leftMargin, y: rowY - 30},
        end: {x: layout.rightMargin, y: rowY - 30},
        thickness: 1,
        color: colors.gray
    });

    // Payment information
    rowY -= 60;
    const paymentInfoTitle = 'Payment Information:';

    page.drawText(paymentInfoTitle, {
        x: layout.leftMargin,
        y: rowY,
        size: fontSizes.normal,
        font: fonts.bold,
        color: colors.textColor
    });

    rowY -= layout.rowHeight;

    invoiceData.paymentInfo.forEach((line, index) => {
        page.drawText(line, {
            x: layout.leftMargin,
            y: rowY - (index * 15),
            size: fontSizes.small,
            font: fonts.regular,
            color: colors.textColor
        });
    });

    // Notes
    const notesY = rowY - 80;
    const notesTitle = 'Notes:';

    page.drawText(notesTitle, {
        x: layout.leftMargin,
        y: notesY,
        size: fontSizes.normal,
        font: fonts.bold,
        color: colors.textColor
    });

    page.drawText(invoiceData.notes, {
        x: layout.leftMargin,
        y: notesY - 20,
        size: fontSizes.small,
        font: fonts.oblique,
        color: colors.textColor
    });

    // Footer with light background
    const footerContent = `${invoiceData.company.name} | ${invoiceData.company.website}`;

    page.drawRectangle({
        x: 0,
        y: 0,
        width: width,
        height: layout.footerHeight,
        color: colors.lightGray
    });

    page.drawText(footerContent, {
        x: width / 2 - 120,
        y: 15,
        size: fontSizes.small,
        font: fonts.regular,
        color: colors.textColor
    });

    // Save the PDF
    const pdfBytes = await pdfDoc.save();
    await fs.writeFile('invoice.pdf', pdfBytes);

    console.log('Professional invoice created successfully!');
}

// Handle any potential errors
createInvoice().catch(err => {
    console.error('Error creating invoice:', err);
});
This example creates a complete invoice with:
- Branded header and logo.
- Company information.
- Client billing details.
- Itemized table with product/service descriptions.
- Financial calculations for subtotal, tax, and total amount.
- Payment information section.
- Professional footer.
Here's the generated invoice:

Best Practices for PDF Generation with PDF-lib
| Practice | Description |
|---|---|
| Reuse Font Embeddings | Call embedFont() once and pass the result to every drawText(). Re-embedding the same font per page wastes memory. |
| Error Handling | Wrap PDFDocument.load() in try-catch – corrupted or password-protected PDFs will throw. Validate file existence before fs.readFile(). |
| Coordinate Helpers | Write small helpers for common positions (margins, centered text). PDF-lib's bottom-left origin makes manual math error-prone. |
| Image Format | Use JPEG for photos and PNG for graphics with transparency. Avoid large uncompressed PNGs – they inflate file size. |
| Metadata | Always set setTitle(), setAuthor(), and setCreationDate(). This helps PDF readers display document info and improves indexing. |
| Testing | Compare generated PDF byte output against a known-good snapshot, or use pdf-parse to extract and assert text content. |
Alternative: Template-Based PDF Generation
PDF-lib gives you fine-grained document control, but managing all that coordinate math adds code to your application. For projects where simplicity and scalability matter more, template-based PDF generation APIs like PDFBolt let you design once in HTML/CSS and generate at scale.
Invoice Example with PDFBolt API
Here's how the same invoice from our PDF-lib example would look using PDFBolt's template approach:
Step 1: Design Your Template
- Create an account at PDFBolt.
- Use the visual template designer to build your invoice layout with HTML/CSS.
- Add Handlebars placeholders like
{{company.name}}and{{items}}for dynamic content. - Test with sample data, publish, and get your template ID.
Step 2: Generate PDFs with Simple API Calls
Here's how the same invoice generation would look using PDFBolt's template system:
Node.js Implementation
const fs = require('fs');

async function generatePdf() {
    const response = await fetch('https://api.pdfbolt.com/v1/direct', {
        method: 'POST',
        headers: {
            'API-KEY': 'XXXXXXXX-XXXX-XXXX-XXXX-XXXXXXXXXXXX',
            'Content-Type': 'application/json'
        },
        body: JSON.stringify({
            templateId: 'your-template-id',
            templateData: {
                "company": {
                    "name": "Awesome Company Inc.",
                    "details": [
                        "123 Business Avenue, Suite 100",
                        "San Francisco, CA 94107",
                        "[email protected]",
                        "+1 (555) 123-4567"
                    ],
                    "website": "www.awesomecompany.com"
                },
                "invoice": {
                    "number": "INV-2025-0427",
                    "date": "April 27, 2025",
                    "dueDate": "May 27, 2025",
                    "paymentTerms": "Net 30"
                },
                "client": {
                    "name": "Client Company LLC",
                    "details": [
                        "Attn: John Smith",
                        "456 Client Street",
                        "New York, NY 10001",
                        "[email protected]"
                    ]
                },
                "items": [
                    {
                        "id": 1,
                        "description": "Website Development Services",
                        "quantity": 1,
                        "amount": 3500.0
                    },
                    {
                        "id": 2,
                        "description": "UI/UX Design",
                        "quantity": 1,
                        "amount": 1200.0
                    },
                    {
                        "id": 3,
                        "description": "Content Creation",
                        "quantity": 10,
                        "amount": 800.0
                    },
                    {
                        "id": 4,
                        "description": "Hosting Setup (Annual)",
                        "quantity": 1,
                        "amount": 240.0
                    }
                ],
                "taxRate": 0.08,
                "paymentInfo": [
                    "Bank: International Bank of Example",
                    "Account Name: Awesome Company Inc.",
                    "Account Number: 1234567890",
                    "Payment Terms: Net 30"
                ],
                "summary": {
                    "subtotal": 5740.0,
                    "tax": 459.2,
                    "total": 6199.2
                },
                "notes": "Thank you for your business! Please make payment by the due date."
            }

        })
    });

    if (!response.ok) {
        const errorText = await response.text();
        throw new Error(`HTTP ${response.status} - ${errorText}`);
    }

    const pdfBuffer = await response.arrayBuffer();
    fs.writeFileSync('invoice_pdfbolt.pdf', Buffer.from(pdfBuffer));
    console.log('PDF generated successfully');
}

generatePdf().catch(console.error);
This approach moves the layout work from code to a visual template designer, which can simplify your application code without sacrificing output quality.
Learn more about API-driven PDF creation:
- Template Gallery - Pre-built professional templates.
- API Documentation - Complete integration guide.
- Node.js Examples - Ready-to-use code samples.
Additional PDF Generation Methods – beyond templates, PDFBolt also supports:
- HTML to PDF: Send raw HTML content for direct PDF conversion.
- URL to PDF: Convert any web page to PDF.
Explore HTML to PDF and URL to PDF conversion methods.
Conclusion
PDF-lib is a solid, dependency-free library for generating and modifying PDFs in Node.js. Its pure JavaScript implementation means no Chromium binary, no native add-ons – just npm install and go. The trade-off is that you manage every coordinate, font embedding, and page break yourself.
That works well for invoices, forms, watermarks, and PDF merging. For other use cases, consider these alternatives:
- HTML to PDF conversion: Puppeteer or Playwright render full HTML/CSS into PDFs.
- Declarative layouts: PDFMake uses JSON document definitions with automatic pagination.
- High-volume generation: A dedicated HTML to PDF API handles rendering and scaling for you.
For a side-by-side comparison of all these options, see Top Node.js PDF Generation Libraries Compared.
Remember: life is like a PDF – sometimes you need to add a little structure to make everything look good! 🎨