iText 7: Convert HTML to PDF in C# and .NET (Tutorial)

Generating PDFs from HTML in C# applications is a common requirement for invoices, reports, and business documents. This guide walks you through iText 7 HTML to PDF conversion in .NET – the modern, redesigned successor to iTextSharp – combined with Razor templating for dynamic document generation. You'll set up the project from scratch, build a working invoice generator with precise layout control, and get ready-to-use code examples using iText 7's pdfhtml module.
What is iText 7 for .NET?
iText 7 for .NET is a full-featured document processing library for creating, manipulating, and processing PDF documents in C#. As the modern successor to the legacy iTextSharp library (which was the C# port of iText 5), iText 7 was completely redesigned with a more intuitive object-oriented architecture that is easier to work with and offers more functionality.
Evolution from iTextSharp to iText 7
iText began as a Java library, with iTextSharp serving as its .NET port. While iTextSharp (based on iText 5) is still functional, iText 7 for .NET represents a complete rewrite that offers:
- A cleaner, more intuitive API.
- Superior HTML to PDF conversion capabilities.
- Better performance and memory efficiency.
- Better typography and layout control.
- Improved extension mechanisms.
- Wider internationalization support.
Benefits of iText 7 for HTML to PDF Conversion
- Flexible Document Creation: Generate PDFs from scratch or convert existing content.
- Advanced Layout Control: Precise positioning, pagination, and content flow management.
- Rich Text Formatting: Typography, styles, and internationalization support.
- Data-Driven Content: Plug dynamic data into templates.
- Document Security: Add encryption, digital signatures, and access controls.
- Compliance Features: Meet accessibility standards and regulatory requirements.
- Performance: Handles large-scale document processing efficiently.
iText 7 is available under the AGPL license for open-source projects, which requires applications using it to also be open-source. For commercial applications where you cannot share your source code, commercial licensing options are available from iText Software.
Why Use iText 7 with Razor for HTML to PDF in C#?
The combination of iText 7 with Razor template engine creates a practical workflow for document generation:
- Separation of Design and Logic: Designers can focus on templates while developers handle data integration.
- Familiar Syntax: Use your existing C# skills with Razor's templating syntax.
- Easy Maintenance: Update document designs without modifying core application code.
- Reusable Components: Create template libraries that can be shared across different document types.
- Dynamic Content Generation: Pull in data from different sources.
This approach gives you the design flexibility of HTML/CSS together with the precise document control of iText 7.
iText 7 HTML to PDF in C#: Step-by-Step Implementation
The following steps walk through a complete invoice generation system using iText 7 and Razor templates. This approach can be adapted for any type of document you need to generate.
Step 1: Set Up Your Development Environment
Before we begin coding, make sure your development environment has all the necessary tools installed.
| Requirement | Details |
|---|---|
| IDE | Visual Studio, Visual Studio Code or JetBrains Rider |
| .NET Core/.NET | .NET Core/.NET 5/6/7/8/9 (or .NET Framework 4.6.1+) |
| NuGet Package Manager | For installing required packages |
Step 2: Create a New .NET Project
Start with a fresh console application for the PDF generation code.
Let's create a new console application:
dotnet new console -n HtmlToPdfGenerator
cd HtmlToPdfGenerator
Or create a new Console Application project through your IDE interface.
Step 3: Configure Project Structure
A clear project structure makes the code easier to maintain and navigate.
Set up the following directory structure:
HtmlToPdfGenerator/
├── Program.cs                  # Main application entry point
├── Models/                     # Data models
│   └── InvoiceModel.cs         # Invoice data structure
├── Templates/                  # Razor templates
│   └── Invoice.cshtml          # Invoice template
├── Services/                   # Service classes
│   ├── RazorTemplateService.cs # Template rendering service
│   └── PdfGenerationService.cs # PDF generation service
└── Output/                     # Generated PDFs
Step 4: Install Required NuGet Packages
These packages provide the core functionality for our PDF generation and templating system.
Add the necessary packages to your project:
dotnet add package itext7
dotnet add package itext7.bouncy-castle-adapter
dotnet add package itext7.pdfhtml
dotnet add package RazorLight
We've added the following libraries:
- itext7 - Core library for PDF generation and manipulation.
- itext7.bouncy-castle-adapter - Required cryptographic dependency for iText 7. Without this package, you will get runtime errors.
- itext7.pdfhtml - HTML to PDF conversion module for iText 7. The core iText 7 library does not include HTML conversion on its own. Without this package, you cannot convert HTML to PDF using iText 7.
- RazorLight - Template engine for rendering Razor views outside of ASP.NET Core.
Step 5: Create the Invoice Data Model
Let's create a model to represent our invoice data. This class serves as the structured data container that will populate our Razor templates, providing a strongly-typed approach to document generation.
Add the following class to the Models directory:
InvoiceModel.cs
namespace HtmlToPdfGenerator.Models
{
    // Represents an invoice details
    public class InvoiceModel
    {
        public string InvoiceNumber { get; set; }
        public DateTime InvoiceDate { get; set; }
        public DateTime DueDate { get; set; }
        public string CompanyName { get; set; }
        public string CompanyAddress { get; set; }
        public string CompanyEmail { get; set; }
        public string CompanyPhone { get; set; }
        public string ClientName { get; set; }
        public string ClientAddress { get; set; }
        public string ClientEmail { get; set; }

        // Collection of invoice line items
        public List<InvoiceItem> Items { get; set; } = new List<InvoiceItem>();

        // Other invoice properties
        public decimal TaxRate { get; set; }
        public string Currency { get; set; } = "$";
        public string? Notes { get; set; }

        // Calculated properties
        public decimal Subtotal => Items.Sum(item => item.Total);
        public decimal TaxAmount => Math.Round(Subtotal * (TaxRate / 100), 2);
        public decimal Total => Subtotal + TaxAmount;
    }

    public class InvoiceItem
    {
        public string Description { get; set; }
        public int Quantity { get; set; }
        public decimal UnitPrice { get; set; }
        public decimal Total => Quantity * UnitPrice;
    }
}
Step 6: Create the Razor Template for the Invoice
The Razor template defines the visual layout of our invoice, combining HTML/CSS with dynamic data from our model. Let's design the invoice template using Razor syntax.
Create a file named Invoice.cshtml in the Templates directory:
Invoice.cshtml Template
@model HtmlToPdfGenerator.Models.InvoiceModel
<!DOCTYPE html>
<html lang="en">
<head>
    <meta charset="UTF-8">
    <title>Invoice @Model.InvoiceNumber</title>
    <style>
        body {
            font-family: 'Segoe UI', Tahoma, sans-serif;
            font-size: 13px;
            color: #333;
            margin: 0;
            padding: 0;
        }

        .invoice-container {
            max-width: 900px;
            padding: 40px;
            background-color: #fff;
        }

        .invoice-header {
            position: relative;
            margin-bottom: 40px;
            padding-bottom: 50px;
            border-bottom: 2px solid #EBE8FA;
        }

        .invoice-title {
            font-size: 40px;
            font-weight: 600;
            color: #660DA7;
        }

        .company-details {
            position: absolute;
            top: 0;
            right: 0;
            text-align: right;
            font-size: 14px;
            line-height: 1.6;
        }

        .invoice-details {
            display: flex;
            justify-content: space-between;
            margin-bottom: 30px;
        }

        .client-info, .invoice-info {
            flex: 1;
        }

        .section-title {
            font-size: 18px;
            font-weight: 600;
            color: #660DA7;
            margin-bottom: 10px;
            border-bottom: 1px solid #EBE8FA;
            padding-bottom: 5px;
        }

        .invoice-table {
            width: 100%;
            border-collapse: collapse;
            margin-bottom: 25px;
        }

        .invoice-table th {
            background-color: #660DA7;
            font-size: 16px;
            color: #fff;
            font-weight: 600;
            padding: 10px;
            text-align: left;
        }

        .invoice-table td {
            padding: 10px;
            border-bottom: 1px solid #e0e0e0;
        }

        .invoice-table tr:last-child td {
            border-bottom: none;
        }

        .invoice-table tr:nth-child(even) {
            background-color: #f9f9f9;
        }

        .summary-table {
            width: 100%;
            max-width: 350px;
            margin-left: auto;
            border-collapse: collapse;
            margin-bottom: 30px;
        }

        .summary-table td {
            padding: 8px 10px;
        }

        .summary-table tr:last-child td {
            background-color: #f3f2f9;
            font-weight: bold;
            font-size: 15px;
            border-top: 2px solid #660DA7;
        }

        .notes {
            padding: 20px;
            background-color: #f3f2f9;
            border-left: 4px solid #660DA7;
            margin-top: 20px;
            border-radius: 4px;
        }

        .footer {
            text-align: center;
            color: #999;
            font-size: 12px;
            padding-top: 20px;
            border-top: 1px solid #EBE8FA;
            margin-top: 40px;
        }

        .text-right {
            text-align: right;
        }
    </style>
</head>
<body>
<div class="invoice-container">
    <div class="invoice-header">
        <div class="invoice-title">INVOICE</div>
        <div class="company-details">
            <div><strong>@Model.CompanyName</strong></div>
            <div>@Model.CompanyAddress</div>
            <div>Email: @Model.CompanyEmail</div>
            <div>Phone: @Model.CompanyPhone</div>
        </div>
    </div>

    <div class="invoice-details">
        <div class="client-info">
            <div class="section-title">Bill To</div>
            <div><strong>@Model.ClientName</strong></div>
            <div>@Model.ClientAddress</div>
            <div>@Model.ClientEmail</div>
        </div>
        <div class="invoice-info">
            <div class="section-title">Invoice Details</div>
            <table style="width: 100%;">
                <tr>
                    <td><strong>Invoice #:</strong></td>
                    <td>@Model.InvoiceNumber</td>
                </tr>
                <tr>
                    <td><strong>Issue Date:</strong></td>
                    <td>@Model.InvoiceDate.ToString("MMMM dd, yyyy", System.Globalization.CultureInfo.InvariantCulture)</td>
                </tr>
                <tr>
                    <td><strong>Due Date:</strong></td>
                    <td>@Model.DueDate.ToString("MMMM dd, yyyy", System.Globalization.CultureInfo.InvariantCulture)</td>
                </tr>
            </table>
        </div>
    </div>

    <table class="invoice-table">
        <thead>
        <tr>
            <th>Description</th>
            <th>Quantity</th>
            <th>Unit Price</th>
            <th class="text-right">Amount</th>
        </tr>
        </thead>
        <tbody>
        @foreach (var item in Model.Items)
        {
        <tr>
            <td>@item.Description</td>
            <td>@item.Quantity</td>
            <td>@[email protected]("0.00")</td>
            <td class="text-right">@[email protected]("0.00")</td>
        </tr>
        }
        </tbody>
    </table>

    <table class="summary-table">
        <tr>
            <td>Subtotal:</td>
            <td class="text-right">@[email protected]("0.00")</td>
        </tr>
        <tr>
            <td>Tax (@Model.TaxRate%):</td>
            <td class="text-right">@[email protected]("0.00")</td>
        </tr>
        <tr>
            <td>Total:</td>
            <td class="text-right">@[email protected]("0.00")</td>
        </tr>
    </table>

    @if (!string.IsNullOrEmpty(Model.Notes))
    {
    <div class="notes">
        <div class="section-title">Notes</div>
        <div>@Model.Notes</div>
    </div>
    }

    <div class="footer">
        Thank you for your business!
    </div>
</div>
</body>
</html>
This template uses standard CSS for a clear invoice layout. The Razor syntax (@Model.PropertyName) inserts dynamic content from our data model.
Step 7: Create the Razor Template Service
This service handles the rendering of Razor templates with our data models, converting them to HTML.
Create RazorTemplateService.cs in the Services directory:
RazorTemplateService.cs
using RazorLight;

namespace HtmlToPdfGenerator.Services
{
    // Service for rendering Razor templates to HTML
    public class RazorTemplateService
    {
        private readonly RazorLightEngine _engine;

        public RazorTemplateService()
        {
            // Initialize the RazorLight engine
            _engine = new RazorLightEngineBuilder()
                // Set the root directory for template resolution
                .UseFileSystemProject(Directory.GetCurrentDirectory())
                // Enable caching for better performance
                .UseMemoryCachingProvider()
                .Build();
        }

        // Renders a Razor template file with the provided model data
        public async Task<string> RenderTemplateAsync<T>(string templatePath, T model)
        {
            try
            {
                // Validate template file exists
                if (!File.Exists(templatePath))
                {
                    throw new FileNotFoundException($"Template file not found: {templatePath}");
                }

                // Read the template content from file
                string templateContent = await File.ReadAllTextAsync(templatePath);

                // Generate a unique key for the template
                string templateKey = GetHashString(templatePath);

                // Process the template with the provided model
                string result = await _engine.CompileRenderStringAsync(templateKey, templateContent, model);

                return result;
            }
            catch (Exception ex)
            {
                Console.WriteLine($"Template rendering error: {ex.Message}");
                throw; // Re-throw to allow handling at a higher level
            }
        }

        // Helper method to generate a hash for template caching
        private static string GetHashString(string text)
        {
            using (var sha = System.Security.Cryptography.SHA256.Create())
            {
                var bytes = System.Text.Encoding.UTF8.GetBytes(text);
                var hash = sha.ComputeHash(bytes);
                return Convert.ToBase64String(hash);
            }
        }
    }
}
Step 8: Create the PDF Generation Service with iText 7
Next, we implement the service that converts HTML to PDF using iText 7.
Create PdfGenerationService.cs in the Services directory:
PdfGenerationService.cs
using iText.Html2pdf;
using iText.Html2pdf.Resolver.Font;
using iText.Kernel.Geom;
using iText.Kernel.Pdf;
using Path = System.IO.Path;

namespace HtmlToPdfGenerator.Services
{
    // Service for converting HTML content to PDF using iText 7
    public class PdfGenerationService
    {
        // Converts HTML content to PDF and saves it
        public void GeneratePdfFromHtml(string htmlContent, string outputPath, PdfSettings settings = null)
        {
            // Use default settings if none provided
            settings ??= new PdfSettings();

            try
            {
                // Create output directory if it doesn't exist
                string? directory = Path.GetDirectoryName(outputPath);
                if (!string.IsNullOrEmpty(directory) && !Directory.Exists(directory))
                {
                    Directory.CreateDirectory(directory);
                }

                // Use a FileStream for better control and reliability
                using (var stream = new FileStream(outputPath, FileMode.Create, FileAccess.Write))
                {
                    // Create PDF writer with the stream
                    using (var writer = new PdfWriter(stream))
                    {
                        // Create PDF document
                        using (var pdf = new PdfDocument(writer))
                        {
                            // Set page size
                            pdf.SetDefaultPageSize(settings.PageSize);

                            // Configure HTML to PDF converter
                            ConverterProperties converterProperties = new ConverterProperties();

                            // Set base URI for resource resolution if provided
                            if (!string.IsNullOrEmpty(settings.BaseUri))
                            {
                                converterProperties.SetBaseUri(settings.BaseUri);
                            }

                            // Configure font provider
                            converterProperties.SetFontProvider(new DefaultFontProvider(true, true, true));

                            // Apply document metadata if provided
                            if (settings.Metadata != null)
                            {
                                pdf.GetDocumentInfo().SetTitle(settings.Metadata.Title);
                                pdf.GetDocumentInfo().SetAuthor(settings.Metadata.Author);
                                pdf.GetDocumentInfo().SetSubject(settings.Metadata.Subject);
                                pdf.GetDocumentInfo().SetKeywords(settings.Metadata.Keywords);
                                pdf.GetDocumentInfo().SetCreator(settings.Metadata.Creator);
                            }

                            // Convert HTML to PDF
                            HtmlConverter.ConvertToPdf(htmlContent, pdf, converterProperties);
                        }
                    }
                }

                Console.WriteLine($"PDF successfully generated at: {Path.GetFullPath(outputPath)}");
            }
            catch (Exception ex)
            {
                // Enhanced error logging
                Console.WriteLine($"Error generating PDF: {ex.Message}");
                Console.WriteLine($"Inner Exception: {ex.InnerException?.Message}");
                Console.WriteLine($"Stack Trace: {ex.StackTrace}");
                throw; // Re-throw to allow handling at a higher level
            }
        }
    }

    // Settings class for PDF generation customization
    public class PdfSettings
    {
        // Page size (default A4)
        public PageSize PageSize { get; set; } = PageSize.A4;

        // Base URI for resource resolution (images, CSS)
        public string? BaseUri { get; set; }

        // Document metadata
        public DocumentMetadata? Metadata { get; set; }
    }

    // Container for PDF document metadata properties
    public class DocumentMetadata
    {
        public string? Title { get; set; }
        public string? Author { get; set; }
        public string? Subject { get; set; }
        public string? Keywords { get; set; }
        public string? Creator { get; set; }
    }
}
This service handles:
- Converting HTML content to PDF using iText 7's
pdfhtmlmodule. - PDF customization through the
PdfSettingsclass, which controls page size and document metadata.
Step 9: Implement the Main Program
Finally, we wire it all up in the Program.cs file:
Program.cs
using HtmlToPdfGenerator.Models;
using HtmlToPdfGenerator.Services;

namespace HtmlToPdfGenerator
{
    class Program
    {
        static async Task Main(string[] args)
        {
            Console.WriteLine("Starting HTML to PDF conversion process using iText 7");

            try
            {
                // Define paths for template and output
                string templatePath = Path.Combine("Templates", "Invoice.cshtml");

                // Set output directory
                string outputDir = Path.Combine(
                    Environment.GetFolderPath(Environment.SpecialFolder.UserProfile),
                    "RiderProjects",
                    "HtmlToPdfGenerator",
                    "HtmlToPdfGenerator",
                    "Output"
                );

                // Ensure output directory exists
                Directory.CreateDirectory(outputDir);
                Console.WriteLine($"Output directory: {Path.GetFullPath(outputDir)}");

                // 1. Create sample invoice data
                var invoice = CreateSampleInvoice();
                Console.WriteLine($"Created sample invoice with number: {invoice.InvoiceNumber}");

                // 2. Initialize the template rendering service
                var templateService = new RazorTemplateService();
                Console.WriteLine("Template service initialized");

                // 3. Render the HTML from the Razor template
                string html = await templateService.RenderTemplateAsync(templatePath, invoice);
                Console.WriteLine("Template rendered successfully");

                // 4. Save HTML for debugging (optional)
                string htmlOutputPath = Path.Combine(outputDir, $"Invoice_{invoice.InvoiceNumber}.html");
                await File.WriteAllTextAsync(htmlOutputPath, html);
                Console.WriteLine($"HTML saved to: {Path.GetFullPath(htmlOutputPath)}");

                // 5. Initialize the PDF generation service
                var pdfService = new PdfGenerationService();
                Console.WriteLine("PDF service initialized");

                // 6. Configure PDF settings
                var pdfSettings = new PdfSettings
                {
                    // Set base URI for resource resolution
                    BaseUri = Directory.GetCurrentDirectory(),

                    // Set document metadata
                    Metadata = new DocumentMetadata
                    {
                        Title = $"Invoice {invoice.InvoiceNumber}",
                        Author = invoice.CompanyName,
                        Subject = $"Invoice for {invoice.ClientName}",
                        Keywords = "invoice, billing, payment",
                        Creator = "HTML to PDF Generator using iText 7"
                    }
                };

                // 7. Generate the PDF file
                string pdfFileName = $"Invoice_{invoice.InvoiceNumber}.pdf";
                string pdfOutputPath = Path.Combine(outputDir, pdfFileName);

                // Convert HTML to PDF
                pdfService.GeneratePdfFromHtml(html, pdfOutputPath, pdfSettings);
                Console.WriteLine("PDF generation completed successfully!");
                Console.WriteLine($"PDF saved to: {Path.GetFullPath(pdfOutputPath)}");
            }
            catch (Exception ex)
            {
                // Error handling
                Console.ForegroundColor = ConsoleColor.Red;
                Console.WriteLine($"Error: {ex.Message}");
                Console.WriteLine(ex.StackTrace);
                Console.ResetColor();
            }
        }

        // Helper method to create a sample invoice
        private static InvoiceModel CreateSampleInvoice()
        {
            // Generate an invoice number with current year and random number for uniqueness
            string invoiceNumber = $"INV-{DateTime.Now:yyyy}-{new Random().Next(1000, 9999)}";

            // Create sample invoice data
            return new InvoiceModel
            {
                // Invoice information
                InvoiceNumber = invoiceNumber,
                InvoiceDate = DateTime.Now,
                DueDate = DateTime.Now.AddDays(30),

                // Company details
                CompanyName = "PixelPioneers Studios",
                CompanyAddress = "1000 Game Lane, Pixel City, 54321",
                CompanyEmail = "[email protected]",
                CompanyPhone = "+1 (800) 123-4567",

                // Client information
                ClientName = "EpicQuest Games",
                ClientAddress = "123 Guildhall Ave, Fantasy Town",
                ClientEmail = "[email protected]",

                // Payment details
                Currency = "$",
                TaxRate = 7.5m,
                Notes =
                    "Please don't forget to include the invoice number in your quest for payment completion. Game on!",

                // Invoice line items
                Items = new List<InvoiceItem>
                {
                    new InvoiceItem
                    {
                        Description = "Epic Level Design",
                        Quantity = 10,
                        UnitPrice = 125.00m
                    },
                    new InvoiceItem
                    {
                        Description = "Character Animation",
                        Quantity = 4,
                        UnitPrice = 150.00m
                    },
                    new InvoiceItem
                    {
                        Description = "Server Hosting",
                        Quantity = 2,
                        UnitPrice = 175.00m
                    },
                    new InvoiceItem
                    {
                        Description = "VIP Support Package",
                        Quantity = 1,
                        UnitPrice = 750.00m
                    },
                    new InvoiceItem
                    {
                        Description = "Loot Box Creation",
                        Quantity = 5,
                        UnitPrice = 50.00m
                    }
                }
            };
        }
    }
}
Here's what the main program does step by step:
- Creates sample invoice data.
- Initializes the template service.
- Renders the Razor template with data.
- Sets up the PDF generation service.
- Converts the HTML to PDF.
- Handles any errors that might occur.
Step 10: Run the Application
Execute our program to generate the PDF invoice and verify the results.
With all components in place, you can now run the application:
dotnet run
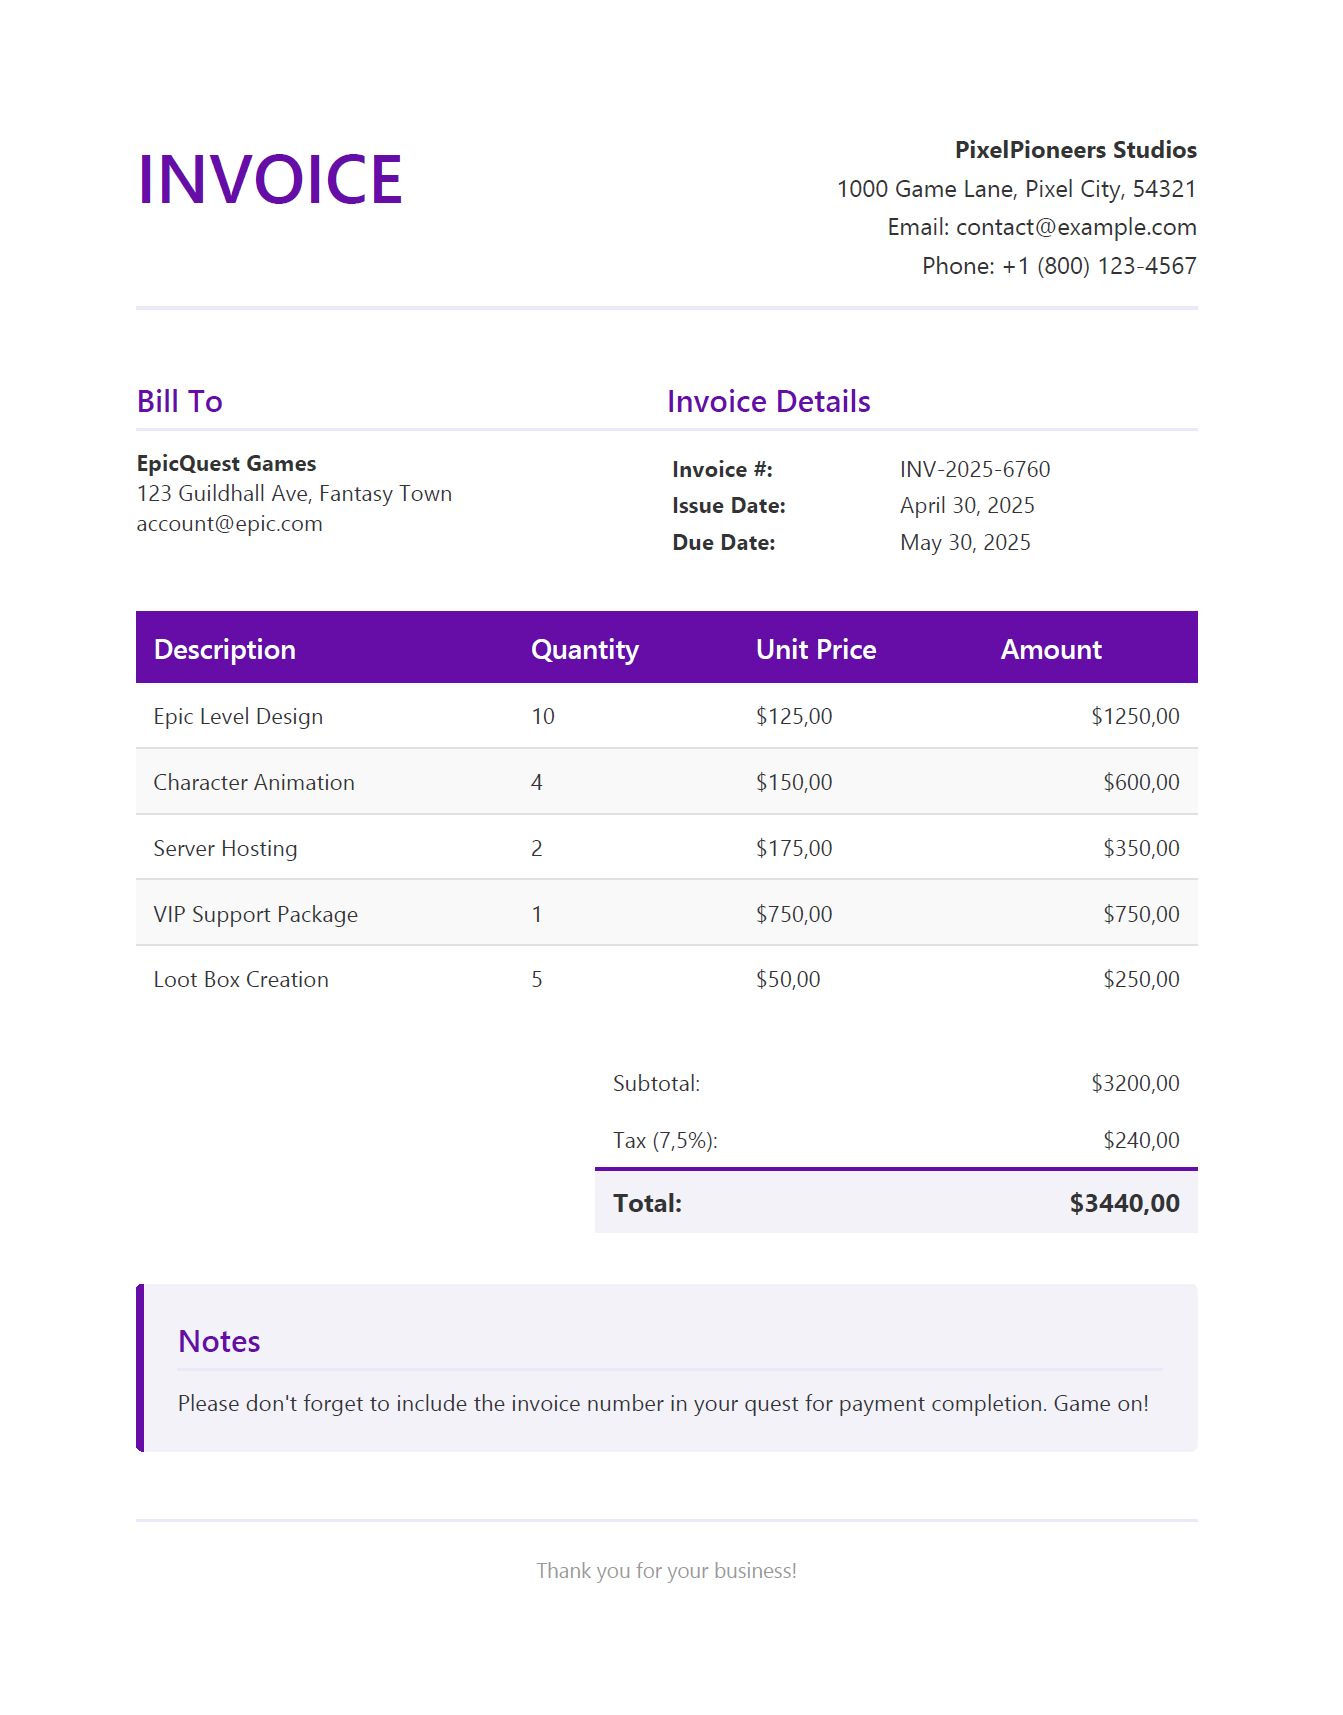
On success, the PDF will be generated and saved to the Output directory.
Preview of the generated invoice PDF:
Troubleshooting iText 7 HTML to PDF Issues
When implementing iText 7 HTML to PDF conversion, you may run into a few issues. Here are the most common ones and how to fix them:
1. PDF Writer Initialization Errors
Errors with PdfWriter or SmartModePdfObjectsSerializer can often be resolved with these approaches:
Solution 1: Use FileStream
Using a FileStream provides better control over file access:
using (var stream = new FileStream(outputPath, FileMode.Create, FileAccess.Write))
{
    using (var writer = new PdfWriter(stream))
    {
        // Your code here
    }
}
Solution 2: Disable Smart Mode
Smart mode is disabled by default. If you previously enabled it via UseSmartMode(), you can disable it on the writer instance:
using (var writer = new PdfWriter(outputPath))
{
    writer.SetSmartMode(false);
    // Your code here
}
2. Font and Character Set Issues
If you have problems with fonts or special characters:
Solution: Configure FontProvider
Replace the deprecated DefaultFontProvider with the newer BasicFontProvider:
// using iText.StyledXmlParser.Resolver.Font;
var fontProvider = new BasicFontProvider(true, true, true);

// Optionally: fontProvider.AddFont("path/to/custom-font.ttf");
converterProperties.SetFontProvider(fontProvider);

// Configure character set
converterProperties.SetCharset("UTF-8");
3. CSS Rendering Differences
If your HTML doesn't render as expected in the PDF:
Solution: Set MediaDeviceDescription
Configure the media type to align with screen-based CSS rendering:
MediaDeviceDescription mediaDescription = new MediaDeviceDescription(MediaType.SCREEN);
mediaDescription.SetWidth(PageSize.A4.GetWidth());
converterProperties.SetMediaDeviceDescription(mediaDescription);
4. File Access Issues
File access errors can occur due to permissions or invalid paths.
Solution: Use a Simple Output Path
Save to a reliable location like the desktop, or ensure the output directory exists:
string outputPath = Path.Combine(
    Environment.GetFolderPath(Environment.SpecialFolder.Desktop),
    $"Invoice_{invoice.InvoiceNumber}.pdf"
);

// Alternatively, create the directory
string outputDir = Path.Combine("Output");
Directory.CreateDirectory(outputDir);
outputPath = Path.Combine(outputDir, $"Invoice_{invoice.InvoiceNumber}.pdf");
iText 7 PDF Generation Performance Tips
For production environments, consider these optimizations:
| Optimization | Description | Implementation Approach |
|---|---|---|
| Template Caching | Avoid repeated template compilation. | Ensure RazorLight's memory caching is enabled with .UseMemoryCachingProvider() in the engine builder. |
| Parallel Processing | Generate multiple documents simultaneously. | Use Parallel.ForEach() with appropriate MaxDegreeOfParallelism for batch processing. |
| Resource Management | Prevent memory leaks and resource exhaustion | Use proper using statements for all disposable objects (FileStream, PdfWriter, PdfDocument) |
| Image Optimization | Reduce PDF file size | Resize and compress images before including them in documents. |
| HTML Simplification | Improve conversion performance. | Simplify complex HTML/CSS structures for more efficient processing. |
| Streaming Output | Reduce memory usage for large documents. | Stream the PDF directly to the output to avoid holding large documents in memory. |
| Lazy Loading | Load resources only when needed. | Implement lazy loading patterns for resource-intensive components. |
API-Based Alternative: Template-Driven PDF Generation
While iText 7 gives you deep control over the PDF output, it also comes with AGPL licensing constraints, dependency management (bouncy-castle, pdfhtml), and font configuration that you need to handle yourself. If your use case is primarily generating documents from HTML templates, a PDF generation API like PDFBolt can remove that overhead.
- No licensing concerns: Skip AGPL compliance or commercial license costs.
- No local dependencies: No NuGet packages to maintain, no bouncy-castle adapter, no font providers to configure.
- Template designer: Build and manage invoice layouts visually, or pick from the template gallery.
- Scales on its own: The API handles load balancing and concurrency – no need to tune
Parallel.ForEachyourself.
C# API call example
using System;
using System.Net.Http;
using System.IO;
using System.Threading.Tasks;
using System.Text.Json;

public class PDFBoltInvoiceExample {
    public static async Task Main(string[] args) {
        using var client = new HttpClient();

        var requestData = new {
            templateId = "your-template-id",
            templateData = new {
                invoice_number = "INV-2025-0042",
                invoice_date = "April 30, 2025",
                due_date = "May 30, 2025",
                company_name = "PixelPioneers Studios",
                company_address = "1000 Game Lane, Pixel City, 54321",
                company_email = "[email protected]",
                company_phone = "+1 (800) 123-4567",
                client_name = "EpicQuest Games",
                client_address = "123 Guildhall Ave, Fantasy Town",
                client_email = "[email protected]",
                line_items = new object[] {
                    new {
                        description = "Epic Level Design",
                        quantity = 10,
                        unit_price = 125.00
                    },
                    new {
                        description = "Character Animation",
                        quantity = 4,
                        unit_price = 150.00
                    }
                }
            }
        };

        var request = new HttpRequestMessage {
            Method = HttpMethod.Post,
            RequestUri = new Uri("https://api.pdfbolt.com/v1/direct"),
            Content = new StringContent(
                JsonSerializer.Serialize(requestData),
                System.Text.Encoding.UTF8,
                "application/json"
            )
        };

        request.Headers.Add("API-KEY", "XXXXXXXX-XXXX-XXXX-XXXX-XXXXXXXXXXXX");

        try {
            using var response = await client.SendAsync(request);

            if (!response.IsSuccessStatusCode) {
                var errorContent = await response.Content.ReadAsStringAsync();
                Console.WriteLine($"HTTP {(int)response.StatusCode}");
                Console.WriteLine($"Error Message: {errorContent}");
                return;
            }

            var pdfBytes = await response.Content.ReadAsByteArrayAsync();
            await File.WriteAllBytesAsync("invoice.pdf", pdfBytes);
            Console.WriteLine("PDF generated successfully");
        } catch (Exception ex) {
            Console.WriteLine($"Error: {ex.Message}");
        }
    }
}
This works well when you need consistent document output across environments without managing iText 7 dependencies locally, or when AGPL licensing is a concern for your project.
Conclusion
Converting HTML to PDF using iText 7 in C#/.NET applications gives you reliable tools for generating production-ready documents with fine-grained control. This combination of Razor templates for design and iText 7 for PDF generation creates a maintainable system well-suited for invoices, reports, contracts, and similar documents.
The C# ecosystem provides multiple approaches to HTML to PDF conversion. For web-based layouts with complex JavaScript, consider PuppeteerSharp, which uses a Chromium-based approach that handles modern web content well. For a code-first API without HTML, QuestPDF is worth a look. And if you want to skip local library setup entirely, a cloud-based HTML to PDF API handles the conversion via a simple REST call.
For developers who need exact control over PDF output and deep customization, iText 7 HTML to PDF in C# – as demonstrated in this guide – offers a good balance of control and output quality. Check the C# quick start guide if you want to compare approaches.
Achievement unlocked: Flawless PDF crafting with Razor and iText 7! 🎮